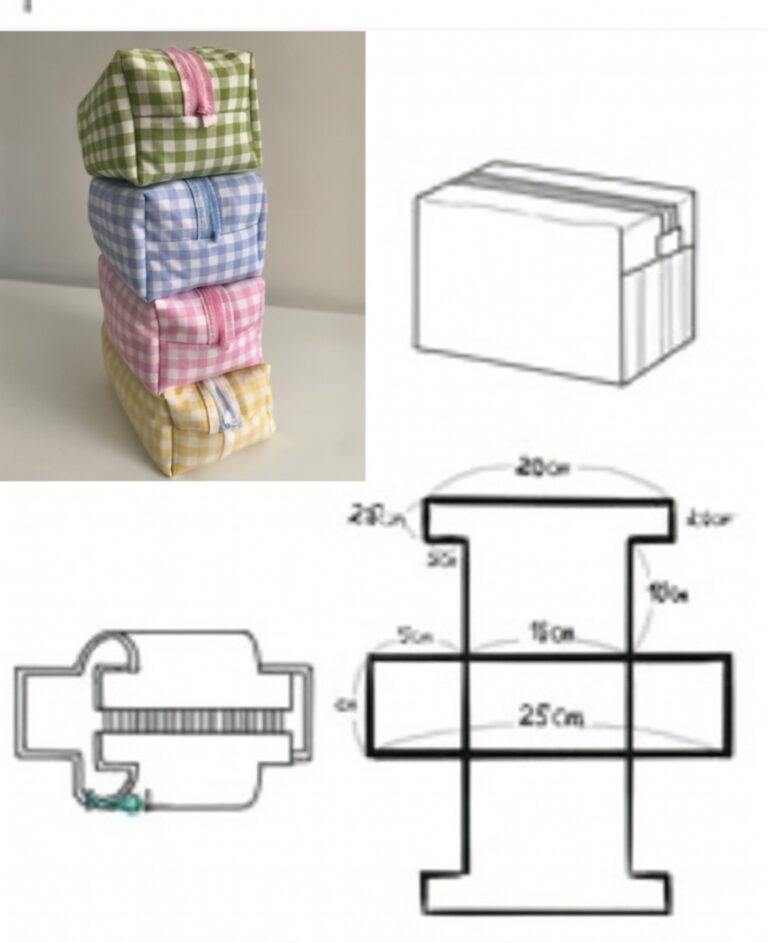
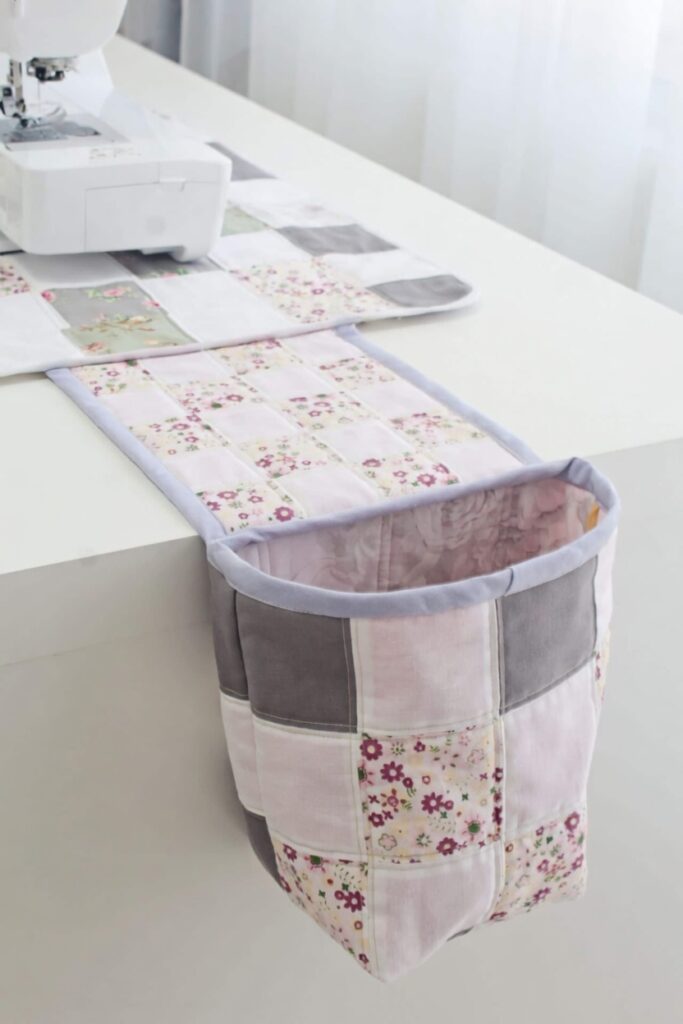
Mini fabric toiletry bag - Quilt Pattern
Horse block – Quilt Pattern is a charming and creative quilting design that captures the grace, strength, and beauty of horses in fabric form. Whether you are an experienced quilter or someone just beginning to explore patchwork, this inspiring block design offers a wonderful opportunity to combine artistic expression with traditional craftsmanship. Throughout this article, you will discover everything you need to know about the Horse block – Quilt Pattern, including techniques, materials, variations, and practical tips to achieve stunning results.
Quilting has long been a storytelling art, and animal-themed blocks have always held a special place in quilt history. The Horse block – Quilt Pattern stands out because it symbolizes freedom, loyalty, and rural heritage. Many quilters choose this pattern to create meaningful gifts, decorate country-style homes, or celebrate equestrian passions. Its versatility makes it suitable for wall hangings, bed quilts, baby quilts, and even decorative pillows.
From fabric selection to block assembly, understanding the structure of the Horse block – Quilt Pattern ensures a polished and professional finish. In the following sections, we will explore the construction process, design considerations, layout ideas, and frequently asked questions. By the end, you will feel confident about creating your own beautiful horse-themed quilt project.
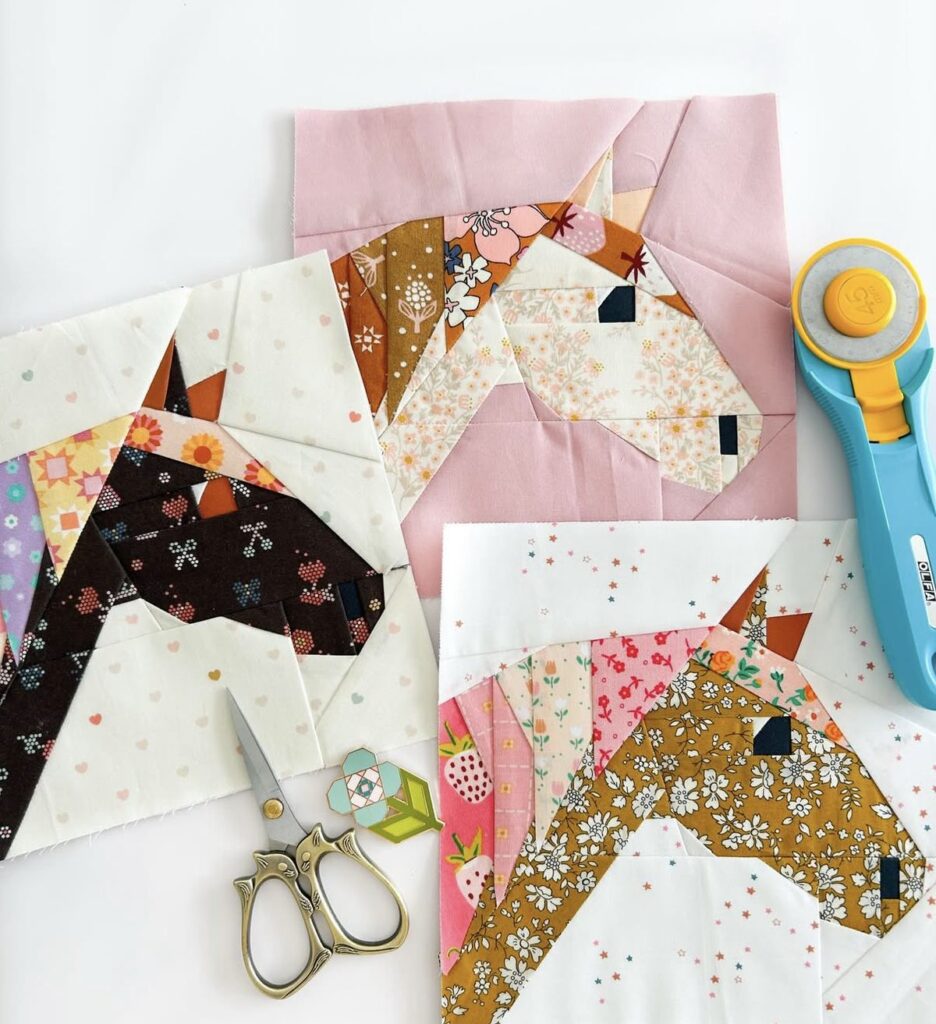
The Horse block – Quilt Pattern typically features a stylized silhouette or pieced representation of a horse within a square or rectangular block. Depending on the complexity of the design, it may use traditional patchwork, appliqué techniques, or foundation paper piecing. Each method offers unique benefits for achieving clean lines and detailed shapes.
One of the most popular approaches is appliqué. With appliqué, the horse shape is cut from a contrasting fabric and stitched onto a background square. This technique is ideal for beginners because it allows flexibility in shaping curves like the horse’s neck, tail, and legs without requiring intricate seam allowances.
For more advanced quilters, foundation paper piecing can provide precise angles and sharp details. This method is especially helpful if the Horse block – Quilt Pattern includes geometric elements or stylized features. Paper piecing ensures accurate placement and consistent block size, which is essential for larger quilt projects.
Block size varies depending on the project. Common dimensions include 8-inch, 10-inch, or 12-inch finished blocks. Larger blocks allow more detail in the horse figure, while smaller blocks create a repeating, dynamic layout when assembled into a quilt top.
Background fabric plays a crucial role in highlighting the horse design. Neutral tones like cream, beige, or soft gray allow the horse silhouette to stand out. Alternatively, sky-inspired blues or sunset shades can create a dramatic, storytelling effect.
Understanding seam allowances is essential for maintaining uniformity. A standard ¼-inch seam allowance ensures that each Horse block – Quilt Pattern fits seamlessly with neighboring blocks. Pressing seams carefully—either open or to one side—will help maintain a flat and smooth quilt top.
Selecting fabrics for your Horse block – Quilt Pattern can transform a simple design into a breathtaking masterpiece. Fabric choice influences not only the visual impact but also the overall mood of the quilt. Thoughtful coordination enhances depth, movement, and realism.
For a classic look, many quilters choose earthy tones such as browns, tans, and rust shades to reflect the natural colors of horses. These hues pair beautifully with neutral backgrounds and evoke a warm, rustic atmosphere. Using subtle prints can add texture without overwhelming the design.
If you prefer a more modern approach, bold and unexpected colors can make the horse block stand out dramatically. Deep navy, emerald green, or even vibrant red can create a contemporary aesthetic. Modern quilting embraces creativity, so do not hesitate to experiment with unique palettes.
Fabric quality is equally important. High-quality quilting cotton provides durability and ease of sewing. Consistent thread count ensures smooth stitching and long-lasting results. Pre-washing fabrics helps prevent shrinkage and color bleeding after the quilt is completed.
Contrast is a key principle in successful quilt design. The Horse block – Quilt Pattern relies on strong visual distinction between the horse figure and the background. High contrast ensures that the shape remains recognizable from a distance.
Texture can also elevate your project. Incorporating subtle batiks, tone-on-tone prints, or lightly textured solids adds dimension. However, avoid overly busy patterns that may obscure the horse silhouette.
Finally, consider how your blocks will interact once assembled. Lay out your fabrics side by side before sewing to evaluate balance and harmony. A cohesive palette will create a unified quilt that feels intentional and thoughtfully designed.
Creating the Horse block – Quilt Pattern begins with accurate cutting. Precision at this stage ensures that all components align properly. Use a rotary cutter, acrylic ruler, and self-healing cutting mat for clean, straight edges.
Start by cutting your background square to the desired unfinished size. If you are using appliqué, trace the horse template onto fusible web, then adhere it to the chosen fabric. Carefully cut out the shape before positioning it on the background square.
When stitching the appliqué, use a narrow zigzag or blanket stitch to secure the edges. Take your time around curves and corners. Slow, steady stitching produces smoother lines and a professional finish. Matching thread color to the horse fabric creates a subtle look, while contrasting thread adds decorative emphasis.
If you are piecing the horse using traditional patchwork, assemble smaller fabric sections according to the pattern layout. Press seams after each step to maintain accuracy. Consistency in seam allowances will prevent distortion of the block.
After completing the horse figure, square up the block. Trimming to the correct unfinished size ensures uniformity across all blocks in your quilt. Even slight variations can cause alignment issues during final assembly.
Once multiple Horse block – Quilt Pattern units are complete, arrange them in your desired layout. You may alternate with solid blocks, sashing strips, or complementary motifs such as stars or barns. Experiment with different arrangements before sewing rows together.
Finally, sew the rows carefully, matching seams at intersections. Press row seams in alternating directions to reduce bulk. A well-assembled quilt top lays flat and prepares you for the quilting stage.
The versatility of the Horse block – Quilt Pattern allows for countless layout possibilities. A simple grid arrangement creates a clean and traditional look, ideal for bed quilts or wall displays. Uniform spacing emphasizes the elegance of the repeated horse motif.
For a more dynamic effect, consider rotating blocks in alternating directions. This technique introduces movement and visual interest. Diagonal layouts can also add a sense of energy, making the quilt feel lively and engaging.
Sashing between blocks provides breathing room and frames each horse design beautifully. Narrow sashing strips in a contrasting color highlight individual blocks, while wider borders create a bold frame around the entire quilt.
Adding borders enhances the finished appearance. A coordinated border fabric can tie together all colors used in the blocks. Double borders—one narrow and one wide—create depth and sophistication.
When it comes to quilting the layers, choose stitching patterns that complement the theme. Gentle wave patterns can suggest open fields, while simple straight-line quilting provides a modern touch. Keep the quilting density balanced to maintain comfort and durability.
Binding is the final step in completing your Horse block – Quilt Pattern project. Select a binding fabric that harmonizes with the overall design. Carefully attach and hand-finish the binding for a polished look that frames your quilt beautifully.
FAQ About Horse block – Quilt Pattern
What skill level is required for the Horse block – Quilt Pattern?
The Horse block – Quilt Pattern can be adapted for various skill levels. Beginners may prefer simple appliqué versions, while advanced quilters can explore detailed piecing techniques.
What size should my horse quilt block be?
Common sizes include 8, 10, or 12 inches finished. Larger blocks allow for more detailed horse shapes and are easier for beginners to handle.
Can I use scraps for this pattern?
Yes, scrap fabrics work wonderfully, especially for creative or whimsical interpretations of the horse silhouette. Ensure strong contrast for clear visibility.
Is this pattern suitable for children’s quilts?
Absolutely. By choosing soft colors and playful fabrics, you can create a charming quilt suitable for a child’s room.
How do I keep my blocks consistent in size?
Accurate cutting, maintaining a ¼-inch seam allowance, and squaring up each block after assembly are essential for consistency.
Can I customize the horse design?
Yes, many quilters personalize their Horse block – Quilt Pattern by adjusting mane styles, tail shapes, or adding decorative elements such as saddles or landscape backgrounds.
The Horse block – Quilt Pattern offers a beautiful way to combine artistry and tradition in quilting. Throughout this article, we explored the structure of the pattern, fabric selection tips, step-by-step assembly guidance, and creative layout ideas. By understanding techniques such as appliqué, piecing, and proper seam management, you can confidently create a polished and meaningful quilt.
Whether you are designing a rustic farmhouse quilt, a heartfelt gift for a horse lover, or a decorative wall hanging, the Horse block – Quilt Pattern provides endless creative opportunities. With careful planning, thoughtful fabric choices, and attention to detail, your finished quilt will showcase both craftsmanship and passion for quilting.


