
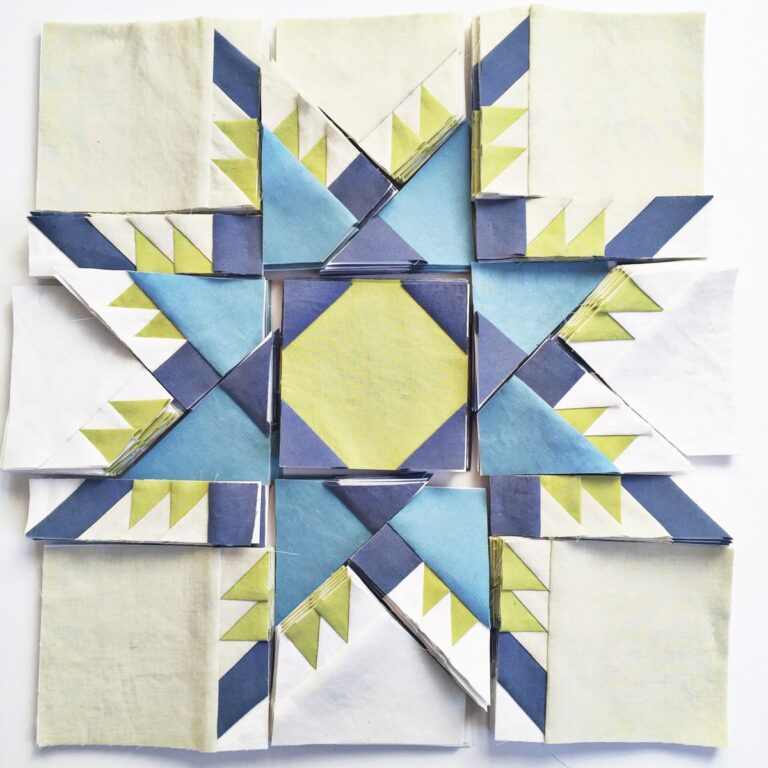
Summer-Country-Star-Flower - Quilt Pattern
How to make a Prairie Point Christmas Tree quilt – Quilt Pattern is a charming and festive project that every quilter will love creating during the holiday season. This delightful quilt block combines the timeless look of prairie points with the cheerful spirit of Christmas trees, resulting in a decorative piece perfect for your home or as a thoughtful handmade gift. Learning this technique is not only enjoyable but also an excellent way to sharpen your quilting skills while making something meaningful.
When you explore the process of how to make a Prairie Point Christmas Tree quilt – Quilt Pattern, you will discover how versatile prairie points can be. They add texture, depth, and dimension to your quilt, making the design stand out. Even if you are new to quilting, this pattern is approachable and rewarding, allowing you to practice folding, pressing, and arranging fabric pieces in a creative way.
This project is ideal for seasonal decorations, table runners, wall hangings, or even as part of a larger quilt. Once you understand the basic steps, you can adapt the Quilt Pattern to different sizes, color schemes, and layouts. Before diving into the tutorial, let’s break down the process into clear sections that guide you from start to finish.
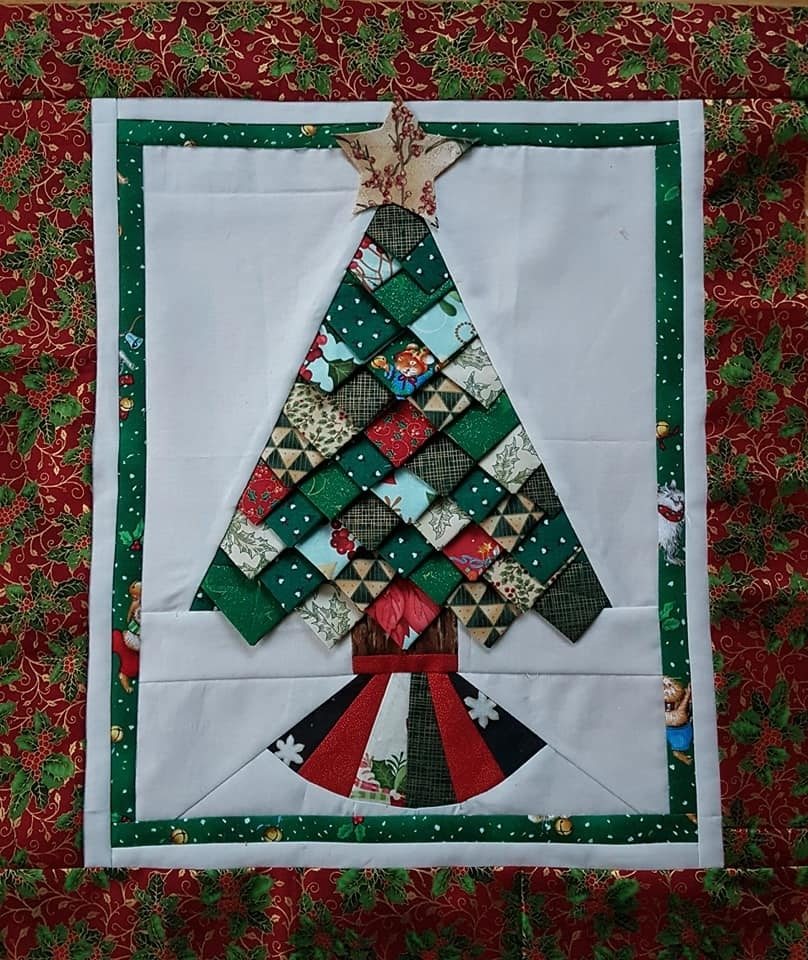
Prairie points are folded triangles made from squares of fabric, often used in quilting to create texture and decorative edges. In the Prairie Point Christmas Tree quilt – Quilt Pattern, these folded pieces are stacked to mimic the layers of a Christmas tree. Their three-dimensional effect makes them a standout element that captures the festive theme beautifully.
To create prairie points, you start with a square of fabric, fold it diagonally to form a triangle, and then fold it again to make a smaller triangle. These layered shapes become the “branches” of your quilted Christmas tree. The folds add volume and create a dynamic design that is visually appealing.
In this pattern, prairie points are not just embellishments; they form the main structure of the tree itself. Each fold represents a branch tier, giving the tree a realistic and artistic look. Understanding their function is key before starting the cutting and folding process.
Many quilters love this technique because it transforms simple fabric squares into something extraordinary. With the right color selection—such as rich greens for the tree and festive prints for accents—you can achieve a stunning holiday centerpiece.
What makes prairie points special is how customizable they are. You can make them small and delicate for a miniature quilt block or large and bold for a wall hanging. The Quilt Pattern allows endless creativity.
By grasping the basics of prairie points, you set a strong foundation for making the Christmas tree quilt design successful. Now, let’s move into fabric choices and preparation.
When learning how to make a Prairie Point Christmas Tree quilt – Quilt Pattern, fabric choice is essential. The right fabric colors and textures bring your Christmas tree to life. Traditional greens work perfectly for the tree itself, while background fabrics in neutral tones allow the tree to stand out.
Quilters often use small prints, batiks, or tone-on-tone fabrics for the prairie points. These fabrics give dimension without overpowering the design. For the background, a snowy white or a warm beige can create a festive contrast.
You will need fabric squares for the prairie points, a background block, batting, backing fabric, and thread. Make sure to have a rotary cutter, cutting mat, and ruler handy, as accuracy is important for creating neat folds.
Before starting, press all fabrics to remove wrinkles. Crisp fabric ensures clean folds for the prairie points. Pre-washing fabrics is also a good idea to prevent shrinking later.
It’s wise to cut more fabric squares than you think you need. Having extra pieces allows you to experiment with the placement and layering of prairie points until you achieve the look you love.
Once your materials are prepared, you are ready to start folding the prairie points that will form the tree layers. This preparation step saves time and ensures smoother assembly during quilting.
Now comes the creative part of how to make a Prairie Point Christmas Tree quilt – Quilt Pattern: folding the prairie points and arranging them into the shape of a tree. This step is both practical and artistic.
Start by cutting fabric squares in equal sizes. Fold each square diagonally into a triangle, then fold it again to make a smaller triangle. Press firmly with an iron to set the folds. Each triangle is now a prairie point.
Arrange the prairie points in rows, with the points facing downward to mimic tree branches. The widest row goes at the bottom, and each row above becomes slightly smaller to create the triangular shape of a Christmas tree.
Overlap each prairie point slightly so the layers resemble branches. Pin or baste them onto the background fabric carefully, keeping the rows straight and balanced. This creates a stacked effect that looks natural.
Once the tree is built, you can add a small fabric square or rectangle at the bottom to serve as the trunk. This simple addition completes the tree design.
This step requires patience, but it’s also rewarding. Watching the tree take shape from simple folded squares is magical. The Quilt Pattern relies on precision and creativity at this stage.
When all the prairie points are pinned in place, you are ready to secure them by stitching along the top edges. This ensures they stay in place while still allowing the folded edges to lift slightly for dimension.
The final step in how to make a Prairie Point Christmas Tree quilt – Quilt Pattern involves quilting and adding finishing touches. This stage transforms your layered fabric pieces into a complete quilt block or project.
After the prairie points are secured, layer the block with batting and backing fabric. Quilt around the edges of the tree, the trunk, and the background to add stability. Stitching in the ditch or echo quilting works well for highlighting the tree shape.
For extra holiday sparkle, you can embellish the quilt with beads, buttons, or embroidery to represent ornaments. A star appliqué at the top adds a festive touch. These details make the project personal and unique.
Binding the edges neatly completes the quilt. Choose a binding fabric that complements your background and tree colors. A contrasting red or gold binding can give it a holiday-ready look.
This pattern can be adapted into many projects: a single block for a pillow, several blocks for a wall quilt, or a long row for a table runner. The versatility of the Quilt Pattern makes it a favorite among quilters.
Experiment with non-traditional colors as well. A modern twist could use blues, silvers, or even scrappy fabrics for a playful effect. Each variation allows you to explore your creativity.
Completing the Prairie Point Christmas Tree quilt is not only fun but also a meaningful way to celebrate the holiday spirit through quilting.
Q: Is the Prairie Point Christmas Tree quilt suitable for beginners?
Yes, this project is beginner-friendly. The folding technique is simple, and the assembly process is straightforward, making it a great learning opportunity.
Q: What size fabric squares should I use for prairie points?
Commonly, 3-inch or 4-inch squares are used, but you can adjust the size depending on how large you want your tree to be.
Q: Can I make the quilt using scraps?
Absolutely! Scraps are perfect for this project, especially if you want a scrappy tree with varied shades of green or even multicolored layers.
Q: Do prairie points need to be sewn down completely?
No, you only need to stitch along the raw edges at the top. The folded edges remain free to create the dimensional effect.
Q: How long does it take to complete the project?
Depending on the size, a block can be finished in just a few hours, while a larger quilted project may take a weekend.
Q: Can I wash a quilt with prairie points?
Yes, but use gentle washing and low heat drying to preserve the folds and prevent fraying.
Learning how to make a Prairie Point Christmas Tree quilt – Quilt Pattern is a rewarding and festive quilting project that combines creativity with tradition. From understanding prairie points and preparing fabrics to folding, layering, and finishing, this tutorial walks you through every step. The result is a decorative piece full of holiday charm.
I hope this guide inspired you to try this quilt pattern and bring festive joy to your sewing space. Have you ever made a Prairie Point project before? Share your honest opinion and suggestions below—I’d love to hear your experiences and ideas!


