
Summer-Country-Star-Flower - Quilt Pattern
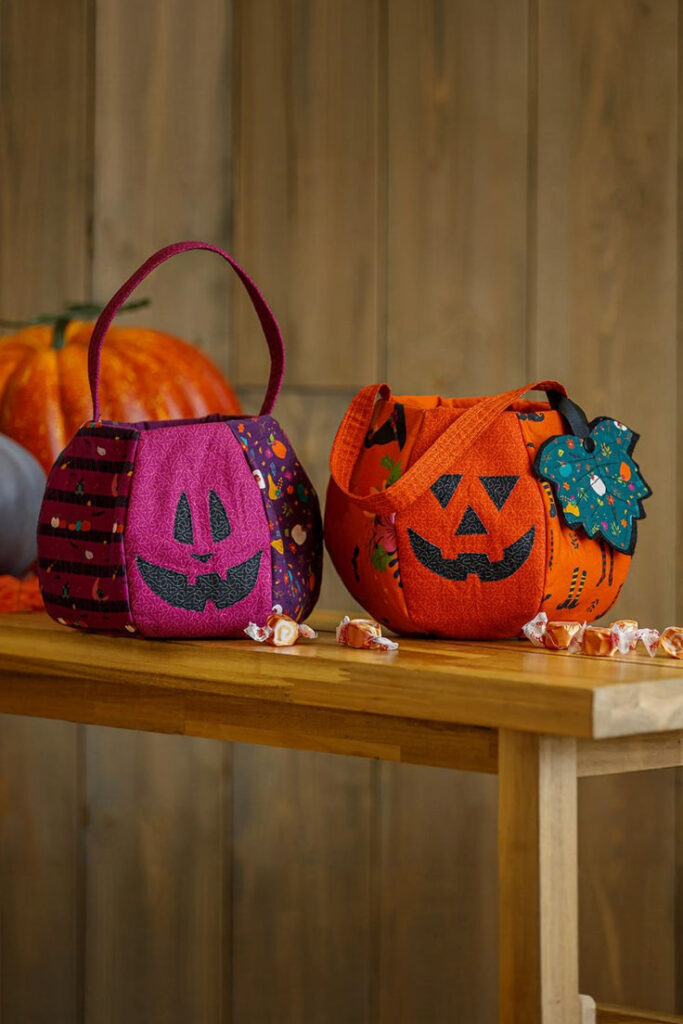
How to Make Little Witch Trick or Treat Baskets – Quilt Pattern is one of the most fun and creative projects you can make for the Halloween season. If you enjoy quilting and love to add a handmade touch to your celebrations, this project will be perfect for you. By creating a charming quilted basket with a magical witch theme, you not only craft something useful for carrying treats but also bring a cozy handmade decoration into your home.
This project allows you to combine playful Halloween elements with traditional quilting techniques. Whether you are an experienced quilter or just starting, you will find this idea rewarding and enjoyable. With simple steps and a bit of creativity, you can design baskets that children can carry while trick-or-treating or that can serve as spooky-yet-sweet home décor.
In this article, we will guide you through everything you need to know about how to make Little Witch Trick or Treat Baskets – Quilt Pattern, including materials, sewing tips, and step-by-step instructions. You will also learn ways to personalize your basket, making it unique for every little witch or wizard in your life.
To start learning how to make Little Witch Trick or Treat Baskets – Quilt Pattern, the first step is to prepare all your materials. Choosing the right fabrics, batting, and quilting tools ensures a strong and attractive finished basket. Think about bold Halloween colors such as black, orange, purple, and green, which are perfect for a witch-themed design.
Make sure to include cotton fabrics, as they are easy to quilt and hold their shape well. For the basket’s structure, you will need batting or fusible interfacing to give strength and stability. You can also add a lining fabric with fun prints like stars, pumpkins, or candy corn to enhance the festive look.
Planning your quilt basket means sketching out your design. Do you want a simple block pattern, or do you prefer adding applique shapes such as a little witch hat, broom, or cauldron? Your choices will give the basket its character.
Another tip is to think about the basket size. For trick-or-treating, smaller children might prefer a lightweight, medium-sized basket. For home use, you can make larger versions that serve as candy holders or Halloween table centerpieces.
Gathering all your supplies before starting helps keep the project stress-free. Having scissors, rotary cutters, quilting rulers, and a sewing machine ready ensures you can work without interruption.
Once everything is in place, you are ready to begin sewing and assembling your Halloween quilt basket. This preparation step sets the foundation for a fun and successful project.
Now that you have prepared your supplies, the next step in how to make Little Witch Trick or Treat Baskets – Quilt Pattern is cutting and piecing the fabrics. Accurate cutting is important to make sure your basket holds its shape and looks professional.
Use a rotary cutter and quilting ruler to cut your fabrics into the shapes you need. Depending on your design, you may want to cut squares, triangles, or rectangles to form patchwork patterns. Precision ensures that the pieces will align neatly.
Next, piece the fabrics together. If you are making a traditional quilt-style basket, sew your blocks into panels. These panels will later form the sides of the basket. You can use simple patchwork or experiment with half-square triangles or strip piecing.
Consider adding applique designs for a witchy effect. A small quilted witch hat on one side or a broomstick stitched into the fabric makes the basket extra special. Applique can be done using fusible webbing or hand stitching, depending on your skill level.
Don’t forget to press your seams flat with an iron after piecing. This makes your quilt panels smooth and easy to sew together. Flat seams also give the finished basket a neat appearance.
Once your panels are assembled, you are one step closer to creating a whimsical Halloween trick-or-treat basket that is both functional and festive.
The third stage in how to make Little Witch Trick or Treat Baskets – Quilt Pattern is putting the quilted panels together and turning them into a basket shape. This is where your project starts coming to life.
Begin by layering each quilted panel with batting and backing fabric. Pin or clip the layers together to prepare for quilting. You can choose straight-line quilting for a modern look or free-motion quilting for a more playful style. Either method adds texture and strength to the basket.
Once quilted, trim the edges of each panel so they are even. Then, sew the panels together along the sides, forming the walls of the basket. Make sure your seams are strong, as the basket will need to hold candy and small items.
Add a quilted base by cutting a matching piece of fabric and attaching it to the bottom. Reinforce the seams so the basket can handle weight without sagging. A double seam or zigzag stitch works well for added durability.
If you prefer a more structured basket, consider adding fusible interfacing inside the panels before sewing. This will give the sides stiffness, making the basket stand upright more easily.
When all panels and the base are connected, turn the basket right side out. At this point, you will clearly see your Halloween-themed Little Witch basket take shape, ready for final details.
The final step in how to make Little Witch Trick or Treat Baskets – Quilt Pattern is finishing the basket with handles and embellishments. This is where you can get creative and make each basket unique.
For handles, cut two fabric strips, fold them lengthwise, and sew them into sturdy straps. You can quilt the handles for extra strength. Attach them securely to the basket sides, ensuring they can support the weight of candy and treats.
Decorations make the basket magical. Consider adding fabric patches shaped like stars, moons, or pumpkins. Small quilted witch hats or broomsticks add extra charm. You can also use embroidery or fabric paint for details.
Another fun option is to line the basket with a contrasting fabric. Bright orange lining with spiderweb prints creates a playful surprise when the basket is opened. A purple lining with silver stars adds a mystical touch.
Don’t forget to bind the raw edges of your basket. Use quilt binding around the top rim to create a clean, finished look. This step also reinforces the edge, preventing wear over time.
Finally, personalize the basket for your child or loved one. Adding their name with embroidery or applique makes the basket special and ensures it will be cherished for years.
With these final touches, your handmade Little Witch Trick or Treat Basket is complete—ready to be filled with candy, treats, and Halloween joy.
Q: What fabrics work best for this quilt basket?
A: Cotton fabrics are the best choice because they are easy to quilt, durable, and hold their shape well. You can mix solids and prints for variety.
Q: Can beginners make this project?
A: Yes, this is a beginner-friendly project. Start with simple patchwork panels and add more advanced techniques like applique as you gain confidence.
Q: How big should the basket be for trick-or-treating?
A: A medium-sized basket works best for children, as it is lightweight and easy to carry. Around 8–10 inches wide and tall is usually perfect.
Q: Do I need special quilting tools?
A: While a sewing machine makes the process faster, you can also sew by hand. Essential tools include scissors, a rotary cutter, quilting ruler, and iron.
Q: How can I make the basket sturdier?
A: Adding fusible interfacing or extra batting will give the sides more structure. Double stitching the seams also helps the basket hold weight.
Q: Can I wash the quilt basket after Halloween?
A: Yes, but it’s best to hand wash and air dry to preserve the structure. Avoid using high heat, as it can affect the interfacing.
In this article, we explored how to make Little Witch Trick or Treat Baskets – Quilt Pattern, from gathering materials and cutting fabrics to quilting, assembling, and decorating the final basket. This creative project combines the fun of Halloween with the timeless art of quilting, resulting in a unique and useful piece.
By following these steps, you can create baskets that bring joy to children during trick-or-treating and serve as delightful decorations in your home. Whether you keep it simple or go all out with appliques and embellishments, the result will be something magical and handmade.
I hope this tutorial has inspired you to try making your own Little Witch Trick or Treat Baskets. Please leave your honest opinion and suggestions—I would love to hear how your project turns out and what personal touches you add!


