
Summer-Country-Star-Flower - Quilt Pattern
How to Sew a Crab Claws Traditionally Pieced – Quilt Pattern is a creative and rewarding process that allows quilters to explore both precision and tradition in patchwork. The Crab Claws quilt block is a striking design that adds movement and texture to any quilt project. By learning the step-by-step approach to creating this block, you can master a technique that blends sharp angles with classic piecing methods. Whether you are a beginner or an experienced quilter, this guide will walk you through everything you need to know to make this block a centerpiece of your quilting journey.
Many quilters enjoy this design because it is both visually dynamic and historically rooted. The pointed “claws” resemble natural shapes and can be arranged in repeating patterns to form a bold quilt layout. Using the traditional piecing method ensures accuracy and preserves the handmade charm that quilting is known for. Throughout this article, you will learn the basics, sewing tips, and finishing techniques so you can confidently sew a Crab Claws Traditionally Pieced Quilt Block.
In addition to teaching you the steps, this article is written to help you understand why this pattern remains so popular among quilting enthusiasts. With patience and the right approach, you will be able to sew a block that captures both artistry and tradition. Now, let’s dive into the detailed instructions and creative possibilities.
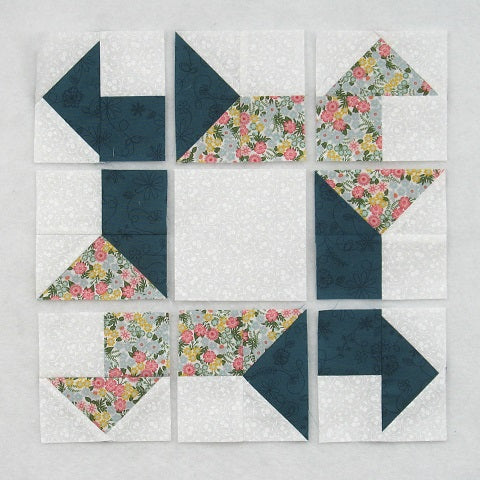
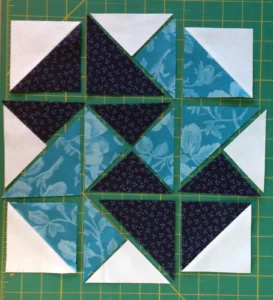
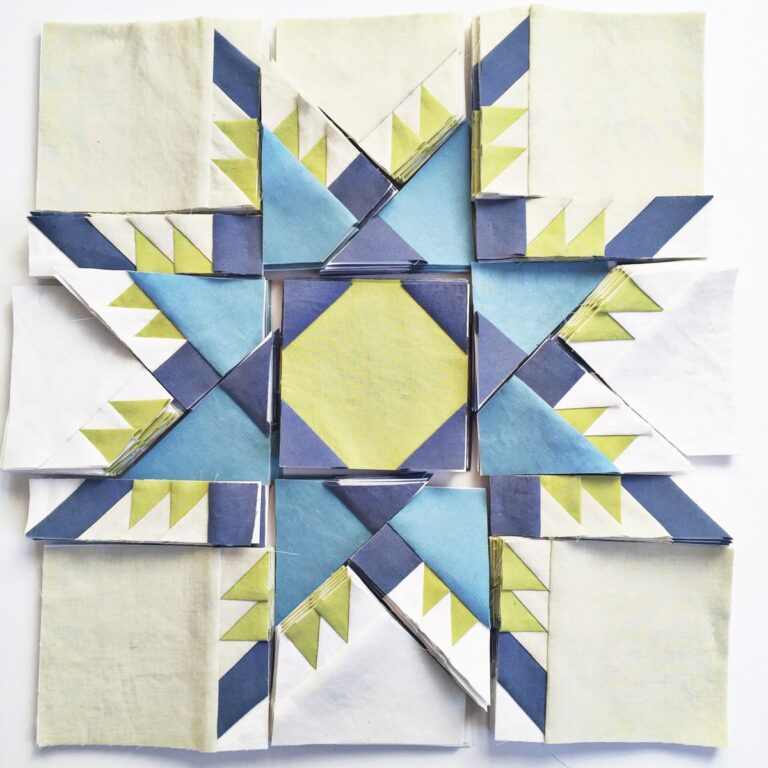
The Crab Claws quilt block is a patchwork pattern that uses sharp triangular units to create the effect of curved, pointed shapes. This block is traditionally pieced, meaning that instead of shortcuts like applique or paper piecing, the quilter works with fabric units cut into precise shapes and sewn together using careful seam alignment.
When you are learning how to sew a Crab Claws traditionally pieced quilt block, the first step is understanding the design itself. Each “claw” is formed with triangle pieces arranged around a central square or triangle, creating a dynamic look that resembles crab pincers.
This quilt block is often used as a focal point in larger quilts, as the design naturally draws the eye. By repeating the block across a quilt top, quilters can create a bold, geometric layout with plenty of movement.
Traditionally pieced blocks like this one are excellent for building sewing skills. They challenge you to cut accurately, press carefully, and stitch consistently, all of which are essential for quilting success.
Another important aspect of this block is fabric selection. High-contrast fabrics highlight the claw-like shapes, while softer color palettes create a gentler flow. Choosing the right fabrics can completely transform the final look of your quilt.
Finally, it’s worth noting that this block connects to quilting history. Many traditional blocks, including this one, have roots in folk designs and symbolic imagery, making them meaningful to stitch and preserve.
Before starting your Crab Claws quilt block, it’s essential to prepare properly. Quilting is a craft that rewards organization, and a little preparation makes the entire process smoother.
Begin by selecting fabrics. To emphasize the claw design, choose a dark fabric for the claws and a lighter fabric for the background. This contrast helps the shapes stand out. If you prefer a modern approach, you can experiment with bold prints or even gradient colors.
Next, gather your tools. A rotary cutter, quilting ruler, and self-healing cutting mat are essential for cutting precise pieces. Accuracy is especially important in this quilt pattern, as each triangle must align correctly.
Once your fabrics are chosen, press them thoroughly. Wrinkles or folds can distort measurements, leading to uneven seams. A well-pressed fabric ensures clean cutting and smooth stitching.
Now, measure and cut your pieces. Most versions of the Crab Claws traditionally pieced quilt block require half-square triangles, quarter-square triangles, and squares. Carefully follow your chosen measurements, and double-check before cutting.
Organize your fabric units into groups for easy assembly. Laying out your pieces on a design board or flat surface helps you visualize the block before sewing, reducing the chances of mixing up pieces.
Finally, thread your sewing machine with a neutral-colored thread that blends with your fabrics. This creates neat seams that don’t distract from the design. Use a ¼-inch seam allowance, which is the standard in quilting.
Now comes the exciting part: learning how to sew a Crab Claws traditionally pieced quilt block. Follow these steps carefully to create a block with precision and beauty.
Start with the triangle units. Sew the half-square triangles together first, pressing each seam open or to the darker fabric, depending on your preference. This ensures accuracy as you build the block.
Next, assemble the quarter-square triangles. Pay close attention to seam alignment so that your points meet neatly in the center. This step is crucial for achieving the crisp, sharp look that defines the Crab Claws block.
Once you have prepared the smaller units, begin arranging them around the central piece. The claws should point outward, creating the signature “crab” appearance. Pin your pieces carefully before sewing to avoid shifting during stitching.
Sew the rows together one at a time, pressing each seam as you go. Consistent pressing helps the block lay flat, which makes the final quilt top easier to assemble.
Check your block dimensions frequently. A traditionally pieced quilt block works best when the size is accurate, as even small mistakes can multiply when sewing multiple blocks into a quilt.
Finally, square up your block. Using a quilting ruler, trim any excess fabric to achieve a perfectly square unit. This ensures your block will fit seamlessly with others in your quilt project.
Completing your Crab Claws traditionally pieced quilt block is rewarding, but there are ways to take your project further with finishing touches and variations.
Once your block is squared and pressed, you can choose how to incorporate it into a quilt. Some quilters prefer using it as a single focal block in a wall hanging, while others repeat the design for a full quilt top.
For added detail, consider sashing between the blocks. Sashing creates space around each block, allowing the Crab Claws design to stand out more clearly. Borders can also frame the quilt beautifully.
Another creative variation is playing with color placement. Try reversing the values, using light fabrics for the claws and darker ones for the background. This creates a unique twist on the traditional look.
Experiment with scrappy versions. Instead of using a single fabric for the claws, combine different prints to give the block a lively, eclectic feel. Scrappy quilts often carry a charming, personal touch.
Don’t forget quilting stitches. Once your quilt top is finished, you can use quilting lines to enhance the claw design. Echo quilting around the shapes or using free-motion designs can add depth and texture.
Lastly, binding your quilt with a coordinating fabric pulls the entire project together. The finishing step of binding not only secures the quilt layers but also frames your Crab Claws block beautifully.
Q: Is the Crab Claws quilt block beginner-friendly?
A: Yes, beginners can make this block, but it requires careful cutting and attention to seam alignment. Practicing with simpler blocks first may help build confidence.
Q: What size should I cut the pieces for this quilt pattern?
A: The size depends on the final block measurement you want. Many tutorials provide cutting charts for different block sizes, so choose one that matches your project.
Q: Can I sew the Crab Claws quilt block using paper piecing instead of traditional piecing?
A: While it’s possible, this article focuses on how to sew a Crab Claws traditionally pieced quilt block to preserve the classic method. Paper piecing may simplify angles but changes the construction style.
Q: How do I keep my points sharp when sewing this block?
A: Accuracy in cutting and using a consistent ¼-inch seam allowance are key. Pinning carefully and pressing seams also help maintain sharp points.
Q: What fabrics work best for the Crab Claws quilt pattern?
A: High-contrast fabrics bring out the claw shapes clearly, while tonal fabrics create a softer effect. Choose fabrics based on the overall mood of your quilt.
Q: How many blocks do I need for a full quilt?
A: The number of blocks depends on the size of your quilt. For example, a lap quilt might need 12–16 blocks, while a bed-sized quilt may require 30 or more.
Learning how to sew a Crab Claws traditionally pieced quilt block – quilt pattern is a rewarding experience that blends tradition with creativity. From preparing your fabrics and tools to sewing precise triangles and finishing your block with variations, this process teaches essential quilting skills while producing a beautiful design.
I hope this article has inspired you to try this quilt block and explore the creative possibilities it offers. If you’ve followed along, I’d love to hear your honest opinion and suggestions about the tutorial. What worked best for you, and what variations did you try? Share your experiences so that other quilting enthusiasts can learn and be inspired too!


