
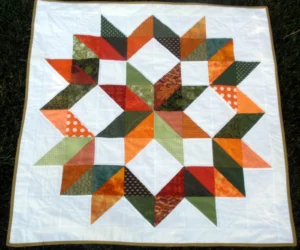
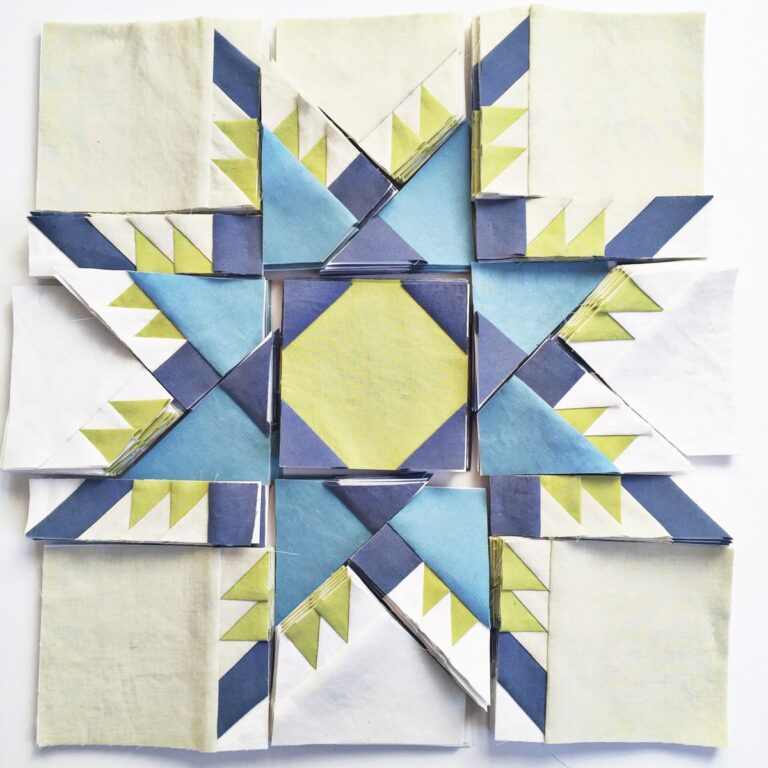
Summer-Country-Star-Flower - Quilt Pattern
How to Sew a Patchwork Puzzle Ball – Quilt Pattern is a delightful and rewarding project that combines the beauty of quilting with the practicality of sewing. This type of fabric puzzle ball is not only a decorative piece but also a wonderful handmade toy for children, offering softness, durability, and creativity. Whether you are a beginner or an experienced quilter, learning to create this charming puzzle ball will enhance your sewing skills and give you a unique project that stands out.
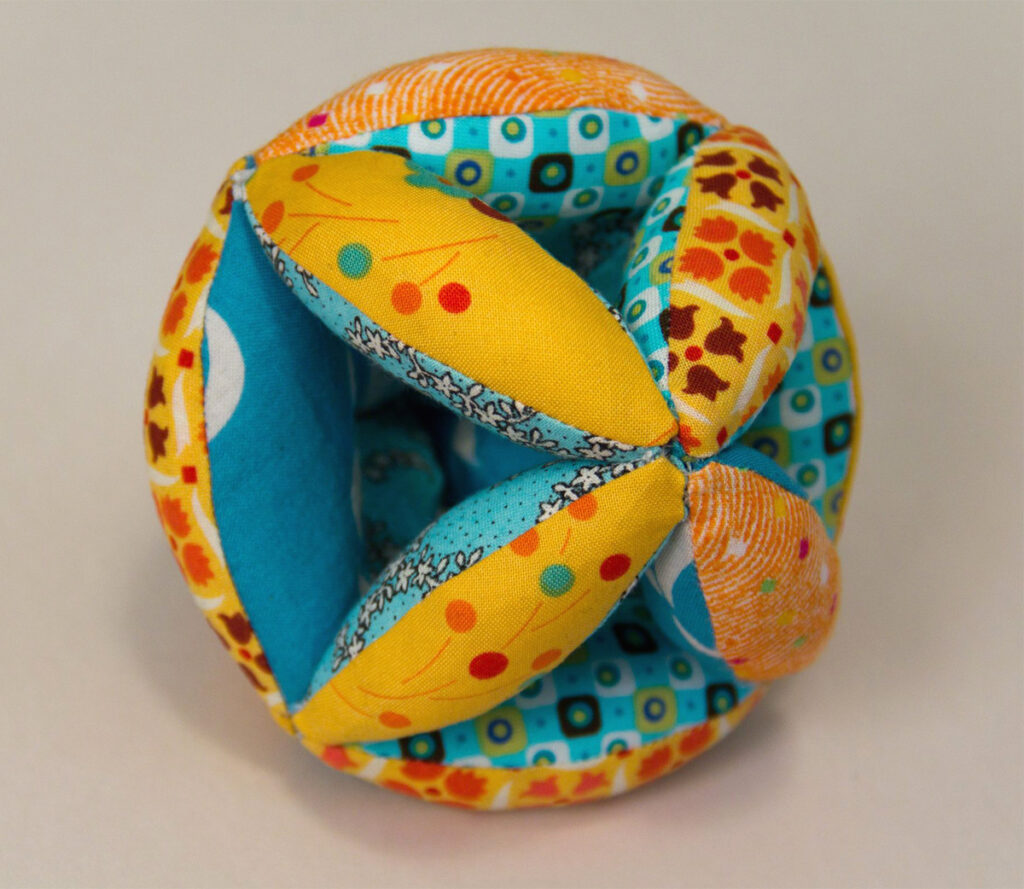
The idea behind the patchwork puzzle ball is simple yet clever. By using small pieces of fabric, you stitch them together in a structured way that forms interlocking shapes. Once stuffed, these shapes assemble into a ball that can be taken apart and put back together like a puzzle. This makes it not only fun but also educational for kids, as it helps develop fine motor skills while playing with a safe, fabric-based toy.
In this article, we will walk through the process of how to sew a patchwork puzzle ball – quilt pattern, step by step. You will learn what materials you need, how to cut and assemble the fabric pieces, how to sew them neatly, and finally how to stuff and finish your puzzle ball. Along the way, we will also share useful tips, highlight common mistakes to avoid, and provide inspiration for variations you can try.
To begin making your patchwork puzzle ball, it is important to prepare all the necessary materials in advance. This ensures a smooth sewing experience without interruptions.
First, you will need fabric scraps. This project is perfect for using leftover quilting fabric, as the small sections can be cut from various prints. Choose soft cotton fabrics that are easy to handle and comfortable to the touch.
Next, prepare batting or fiberfill stuffing. The stuffing is what gives the puzzle ball its shape and makes it soft and squeezable. Polyester fiberfill is lightweight and works very well for this purpose.
You will also need basic sewing tools: scissors or a rotary cutter, quilting pins, a fabric marker or chalk, a ruler, and a good-quality sewing machine. Hand-sewing needles are also useful for finishing touches.
Don’t forget to have a printed quilt pattern or template for the puzzle ball. Templates guide you in cutting consistent shapes, which is crucial for the puzzle pieces to fit together properly.
Finally, consider keeping strong thread in matching or contrasting colors, depending on whether you want your stitches to blend in or stand out as part of the design.
Having these materials organized will save time and help you enjoy the creative process of sewing your puzzle ball.
Once you have your materials ready, the next step in how to sew a patchwork puzzle ball – quilt pattern is to prepare the fabric. Precision in cutting is very important, as even small differences can affect how the pieces fit together.
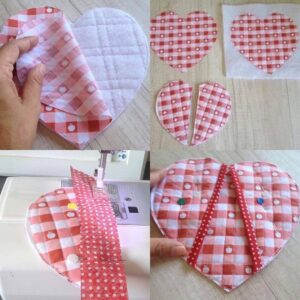
Begin by placing your template on the fabric and tracing the required shapes with fabric chalk or a washable marker. Templates are usually shaped like football or petal pieces, and you will need multiple identical pieces for each section of the puzzle ball.
Cut out the fabric carefully with sharp scissors or a rotary cutter. Make sure to cut along the marked lines and include seam allowances. This ensures that when you stitch the pieces, the shapes will remain even.
Organize your fabric pieces by color or print. Patchwork projects shine when you play with fabric contrast, so plan the layout ahead of time. This will make the puzzle ball visually appealing once it is finished.
After cutting, press the fabric pieces lightly with an iron to remove wrinkles. Smooth pieces are easier to align and sew accurately.
Lastly, stack the fabric pieces in order so you can work efficiently. Keeping them organized will help you avoid confusion during the sewing process.
Now that your pieces are prepared, it’s time to begin sewing. This is where the fun of how to sew a patchwork puzzle ball – quilt pattern truly begins.
Take two fabric pieces and place them right sides together. Pin along the edges and stitch using a small seam allowance, typically a quarter inch. Repeat the process until you have completed the number of petals or sections needed.
As you sew, remember to backstitch at the beginning and end of each seam to secure the stitches. This prevents unraveling and keeps the ball strong even with frequent handling.
Once you have sewn the pieces, press the seams open or to one side with an iron. Pressing ensures neatness and reduces bulk inside the puzzle ball.
The sewn sections usually form three-dimensional shapes. For example, groups of three petals may form one unit. These units are then joined together to create the final spherical puzzle ball.
Sew carefully when assembling the units together, paying attention to alignment. The puzzle ball requires accuracy so that the pieces interlock neatly once stuffed.
Take your time with this step, as precise sewing will give your ball a polished and professional finish.
The final stage of how to sew a patchwork puzzle ball – quilt pattern is stuffing and assembling the puzzle sections. This step transforms flat fabric pieces into a soft, squeezable, and playful object.
Turn each sewn section right side out and carefully push out the corners with a blunt tool like a knitting needle or chopstick. This ensures the shape is even and smooth.
Fill each section with polyester fiberfill. Start with small amounts, pushing the stuffing evenly into all corners before adding more. A well-stuffed piece will hold its shape and fit nicely into the overall puzzle ball.
After stuffing, hand-stitch the opening of each piece with an invisible ladder stitch. Strong, neat stitching is important, as these pieces will be handled often during play.
Once all sections are stuffed, begin assembling them into the puzzle ball. Typically, the ball is made of three interlocking rings, each formed by four stuffed sections. The rings fit together to create the completed ball.
Take your time to adjust the fit of each section until the ball is symmetrical and secure. At this stage, your handmade puzzle ball will come to life, showing off your fabric choices and sewing skills.
Finally, give the ball a gentle press to even out the shape, and it’s ready for use as a toy, gift, or decorative item.
1. Is the patchwork puzzle ball safe for babies and toddlers?
Yes, when made with soft cotton fabric and securely stitched, the puzzle ball is safe. Avoid small embellishments like buttons or beads that could pose choking hazards.
2. Do I need a sewing machine, or can this be done by hand?
While a sewing machine speeds up the process, you can hand-sew the ball with patience. Strong hand stitches such as backstitch will ensure durability.
3. How many fabric pieces are required for one puzzle ball?
It depends on the pattern, but typically you need 12 sections divided into 3 rings of 4 pieces each. Templates provide the exact count.
4. Can I wash the puzzle ball once it’s finished?
Yes, most fabric puzzle balls are washable. Use gentle detergent and air-dry. If gifting it to children, pre-wash the fabric beforehand to avoid shrinking later.
5. What fabrics work best for this project?
Quilting cotton is the most recommended, as it is durable, soft, and easy to sew. You can also experiment with flannel for extra softness.
6. Is this a beginner-friendly sewing project?
Yes, it is suitable for beginners as long as they follow the pattern carefully. It teaches important skills such as cutting accurately, sewing curves, and assembling shapes.
Learning how to sew a patchwork puzzle ball – quilt pattern is a fulfilling project that blends creativity, practicality, and tradition. From selecting fabrics to sewing the sections and assembling the final shape, every step offers the chance to practice quilting techniques while producing something functional and beautiful.
This handmade puzzle ball makes a thoughtful gift for children, a charming addition to a nursery, or even a unique home décor item. By following the steps outlined in this article, you can create your own personalized version and explore different fabric combinations to make each ball truly one of a kind.
I’d love to hear your thoughts on this tutorial. Did you enjoy learning about sewing a patchwork puzzle ball? Feel free to share your opinion, suggestions, or even photos of your finished project—I look forward to your feedback!


