
Cross Door - Quilt Pattern
Learning how to sew slippers – quilt pattern is a rewarding and creative sewing project that combines comfort, functionality, and style. Quilted slippers are not only cozy but also a wonderful way to use leftover fabric scraps and showcase your quilting skills. Many sewing enthusiasts enjoy this project because it is beginner-friendly while still offering room for customization and advanced creativity. Whether you want to make a gift for a loved one or simply craft something practical for yourself, quilted slippers are an excellent choice.
When working on how to sew slippers – quilt pattern, you are creating something truly personal. Unlike store-bought slippers, handmade ones can be adjusted to the exact size of your feet, styled with fabrics you adore, and padded with as much cushioning as you like. Quilters particularly love this project because it allows them to repurpose quilting techniques in a functional and wearable way. This transforms a simple pair of slippers into a piece of quilted art that you can enjoy every day at home.
In this article, we will walk step by step through the process of making quilted slippers. We will discuss the materials you need, how to cut and piece the fabric, sewing tips for success, and ideas for finishing your project beautifully. The focus will remain on how to sew slippers – quilt pattern, ensuring that you understand each stage while also inspiring your own creativity. Let’s get started.
When you begin with how to sew slippers – quilt pattern, your fabric choice is the foundation of the project. Quilted slippers are often made with cotton or flannel, which provide softness and flexibility. You may also want to use batting or fleece to give the slippers a padded, cushioned feel that makes them warm and comfortable.
The outer fabric can be decorative and colorful, making the slippers unique. Many quilters choose fabric leftovers from previous projects, which is an eco-friendly way to repurpose material. You can even mix and match different fabric prints to achieve a patchwork effect that reflects your quilting style.
For the lining, soft cotton or fleece works best because it touches your skin directly. Comfort should always be the top priority in sewing slippers. If you want extra warmth, consider adding a layer of wool or plush fabric inside.
Another important aspect of how to sew slippers – quilt pattern is the sole. You can use felt, suede, or a non-slip fabric designed for footwear projects. This ensures your slippers are safe and practical to walk in around the house. Some people also recycle old jeans or thick canvas for the sole, which adds durability.
In addition to fabrics, gather essential supplies like sharp scissors, sewing pins, quilting thread, and a sewing machine. Hand-sewing is possible, but using a machine gives a stronger finish and saves time. Don’t forget the batting, which is what makes these slippers quilted and cozy.
Finally, remember that choosing high-quality materials at the start will determine the durability of your finished slippers. Since they will be worn regularly, sturdy construction and proper fabric selection are crucial for long-lasting comfort.
The next stage of how to sew slippers – quilt pattern is preparing and cutting your fabric pieces. Begin by making a paper template of your slipper shape. This can be done by tracing around your foot on a piece of paper, then adding extra width for seams and quilting layers. The template should include the sole, the upper top, and the heel section.
Once you have the pattern, place it on your chosen fabrics. Pin the template securely before cutting to ensure precision. Cut each piece twice: one for the outer fabric and one for the lining. Don’t forget to cut batting pieces as well, which will be sandwiched between the layers for a quilted effect.
Careful cutting is one of the most important steps in how to sew slippers – quilt pattern because it determines the accuracy of your finished project. Uneven cutting can cause misalignment, making the slippers uncomfortable or awkwardly shaped. Always measure twice and cut once.
Marking your fabric with fabric chalk is another helpful step. This makes sewing lines clearer and reduces mistakes later. Quilters often pre-mark quilting lines on the upper fabric pieces, which helps guide the stitching for decorative patterns.
Another tip is to prepare all the pieces before sewing begins. This organization saves time and ensures you don’t miss any part of the design. Having the lining, batting, and outer layers stacked and ready makes the assembly stage much smoother.
Lastly, remember that slippers are worn on both feet, so symmetry is key. Always cut mirror-image pieces to ensure the left and right slippers match perfectly in size and shape.
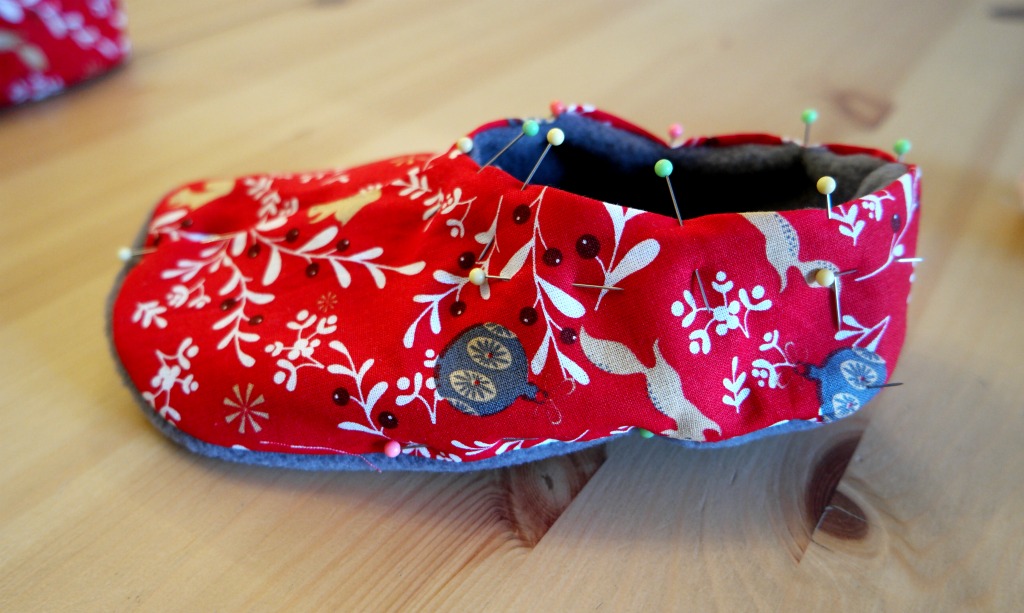
Now comes the most exciting part of how to sew slippers – quilt pattern: stitching everything together. Begin by quilting the upper pieces. Place the outer fabric on top, batting in the middle, and lining underneath. Use safety pins or quilting clips to secure the sandwich before sewing.
Next, stitch along the quilting lines you prepared earlier. This not only holds the layers together but also adds decorative charm to the slippers. Straight lines, diagonal crosshatching, or even free-motion quilting can be used to create unique patterns.
Once the quilting is complete, trim any excess batting and fabric to keep the pieces neat. Precision here ensures that when the slippers are assembled, the seams align cleanly.
Attach the upper part of the slipper to the sole by pinning the edges carefully. This step requires patience because curved edges must fit smoothly together. Go slowly on the sewing machine to avoid puckering. Reinforce the seams for durability, as slippers endure a lot of wear.
For added strength, some sewists like to use a zigzag or overlock stitch along the raw edges inside the slippers. This prevents fraying and makes the slippers more long-lasting.
The beauty of how to sew slippers – quilt pattern is that you can personalize the design at this stage. Adding bias tape around the edges or a decorative stitch on top enhances both the strength and style of the slippers.
The final stage of how to sew slippers – quilt pattern is all about details. Finishing touches make your handmade slippers look professional and add personality. One of the most common methods is binding the edges with bias tape. This creates a neat border and secures the layers firmly.
Another option is to add elastic or a button closure at the top of the slipper. This helps keep the slippers snug on your feet while also adding charm. For children’s slippers, fun appliqués like hearts, stars, or animals can be sewn on top.
Non-slip fabric or rubber paint on the soles can be applied for extra safety. This is especially important for hardwood or tile floors. By adding these touches, you make your slippers both beautiful and practical.
If you enjoy embroidery, this is a perfect time to showcase your skills. Adding embroidered initials or small motifs on the upper part of the slipper transforms them into personalized gifts. Handmade quilted slippers make wonderful presents for birthdays, holidays, or simply as a thoughtful gesture.
Another creative idea is to experiment with patchwork. Using different fabric scraps, you can create a multicolored slipper design that highlights your quilting artistry. Each slipper becomes one-of-a-kind.
Finally, don’t forget to press your finished slippers with a warm iron (avoiding the sole material if it is sensitive). A gentle press smooths out seams and gives your slippers a polished, professional look.
1. Can beginners learn how to sew slippers – quilt pattern?
Yes, this is a beginner-friendly project. While it involves quilting and sewing curves, the steps are simple enough for those with basic sewing skills.
2. What type of fabric is best for quilted slippers?
Cotton, flannel, and fleece are excellent choices. They provide comfort, flexibility, and warmth. For the sole, non-slip materials are highly recommended.
3. Do I need a sewing machine to make quilted slippers?
While hand-sewing is possible, using a sewing machine ensures stronger seams and a more durable finish, especially for everyday use.
4. How can I make my slippers non-slip?
Use suede, felt, or specially designed non-slip sole fabric. Alternatively, apply rubberized paint or grips to the bottom.
5. Can I wash quilted slippers?
Yes, but it depends on the materials used. Cotton and fleece slippers can usually be machine washed on a gentle cycle. For delicate or decorated slippers, hand washing is safer.
6. Are quilted slippers good as gifts?
Absolutely! They are cozy, customizable, and personal. Adding embroidery or unique fabric choices makes them even more special.
In this guide, we explored step by step how to sew slippers – quilt pattern, from selecting fabrics and preparing patterns to quilting, sewing, and adding finishing touches. Handmade quilted slippers are not only practical but also a creative way to express your quilting skills.
I hope this article has inspired you to try making your own pair. Now it’s your turn! Have you ever sewn slippers before? Share your opinion and suggestions in the comments—I would love to hear your experiences and ideas.


