
Cross Door - Quilt Pattern
The log cabin block tutorial – quilt pattern is one of the most beloved and versatile designs in the quilting world. This traditional block has stood the test of time because of its simple structure, endless design possibilities, and deep cultural history. Whether you are just starting out with quilting or already an experienced quilter, mastering the log cabin block opens the door to creating both classic and modern projects.
This pattern is easy to personalize by changing the fabrics, colors, and arrangements of the blocks. Many quilters love the log cabin block tutorial – quilt pattern because it allows them to explore creativity without needing advanced skills. Even beginners can achieve stunning results with this design. Once you understand the method, you can repeat it, mix colors, and create quilts that reflect your own personal style.
In this article, we will walk step by step through the log cabin block tutorial – quilt pattern, explaining its origins, basic construction, creative variations, and practical tips. By the end, you will feel confident enough to create your own log cabin quilt and enjoy the process from start to finish.
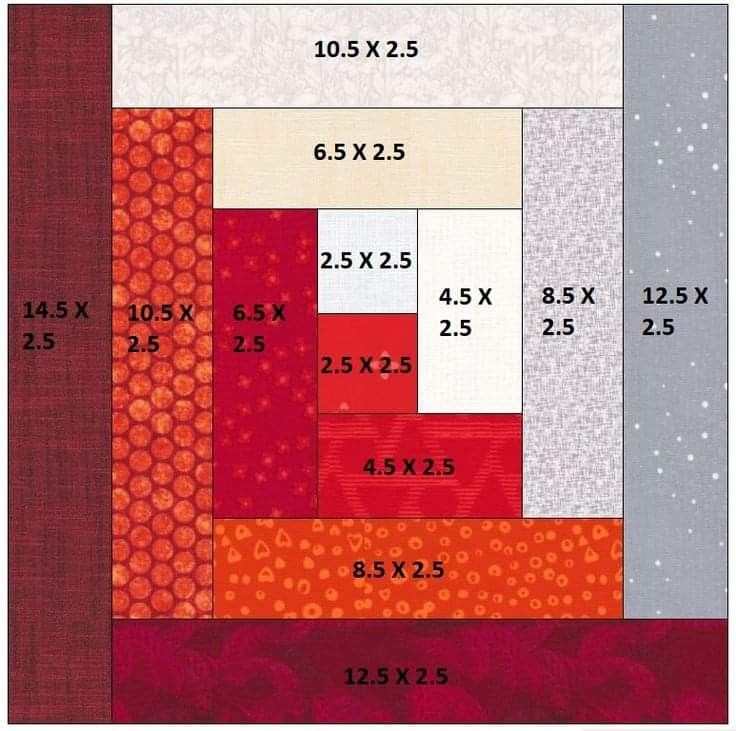
The log cabin block tutorial – quilt pattern gets its name because the design resembles the structure of an old wooden cabin, with strips of fabric (the “logs”) surrounding a central square. Traditionally, the center square is red to represent the warmth of the hearth, but modern quilters experiment with all kinds of colors and prints.
This block is built using a method of layering strips around the center, usually in light and dark contrasting fabrics. The contrast is what creates the striking visual impact of the block. As the layers build outward, a beautiful frame-like effect appears, giving the quilt both depth and balance.
Historically, the log cabin block became popular in the 19th century in America, symbolizing home and stability. Many antique quilts made from this pattern survive today, showing its timeless appeal. Because it is simple and practical, it was a favorite among pioneers and families who quilted with scraps of fabric they had on hand.
In today’s quilting community, the log cabin block tutorial – quilt pattern remains relevant because it adapts well to modern fabrics and trends. Whether you love bold solids, delicate florals, or geometric prints, this block can accommodate your preferences. It can be arranged in endless layouts, such as barn raising, courthouse steps, or sunshine and shadows, each producing a different effect.
The versatility of the log cabin block makes it an ideal starting point for new quilters, but it also offers endless challenges for advanced quilters who wish to experiment. Its combination of history, tradition, and creativity makes it one of the most cherished blocks in the quilting world.
By understanding its origins and structure, you are already one step closer to mastering this cabin block tutorial – quilt pattern and using it in your own projects.
To create a log cabin block tutorial – quilt pattern, start by choosing a fabric palette. It is helpful to separate fabrics into two categories: light and dark. This contrast will highlight the traditional design. You will also need a square for the center, often cut at 2 ½ inches.
The process begins with sewing the center square to the first “log,” which is a fabric strip of the same width but slightly longer than the square. After sewing, press the seam and trim if necessary. Then continue adding logs one by one around the center, always rotating the block so that the strips are added in a spiral order.
Each strip should be pressed flat before adding the next. This step ensures accuracy and keeps the block from becoming distorted. Patience during pressing and trimming is essential to produce a neat result. With every round, the block grows larger, and you can stop once it reaches the desired size.
When following a cabin block tutorial – quilt pattern, accuracy in cutting and consistency in seam allowances make a big difference. Using a rotary cutter, ruler, and cutting mat can help maintain precision. A standard seam allowance of ¼ inch is commonly used in quilting.
The size of your finished block depends on the number of “rounds” of logs you add. For example, four rounds may create a 12-inch block, while fewer rounds will result in a smaller one. Adjusting the number of strips allows flexibility depending on your project.
By carefully following these steps, you can create multiple blocks and join them together to form a complete quilt. Each block becomes a piece of art, contributing to the larger design. The repetition of construction also gives quilters confidence with every block they complete.
The beauty of the log cabin block tutorial – quilt pattern is that it can be reinvented endlessly. One of the simplest variations is changing the color placement. Instead of traditional light and dark contrasts, try gradients, rainbow effects, or even scrappy versions using leftover fabrics.
Courthouse steps is a popular variation where strips are added to opposite sides of the center square instead of spiraling around it. This gives the block a more structured and modern appearance. Sunshine and shadows is another layout that arranges blocks to create striking diagonal patterns across the quilt.
If you enjoy modern quilting, consider using solid fabrics with bold colors. The clean lines of the log cabin block make it perfect for minimalist designs. Large-scale prints can also add an unexpected and dramatic effect to your quilt.
Another creative idea is making “wonky” log cabins, where the strips are cut at irregular angles. This produces a playful and artistic look, perfect for those who prefer less traditional quilts. This approach celebrates imperfections and gives the quilt a unique personality.
Mini log cabin blocks are excellent for smaller projects such as table runners, pillows, or wall hangings. Because the construction method is the same, you can scale the design to fit any project size.
Ultimately, the cabin block tutorial – quilt pattern is a canvas for creativity. By experimenting with layouts and fabric choices, you can design quilts that feel both personal and original, while still connected to the rich tradition of quilting.
When working on a log cabin block tutorial – quilt pattern, preparation is key. Organize your fabrics before cutting, and consider labeling them as “light” and “dark” groups. This step saves time and helps maintain consistency throughout your project.
Chain piecing can speed up the process when making multiple blocks. Instead of sewing one block at a time, sew the same step across several blocks in sequence. This method improves efficiency and keeps your sewing momentum going.
Pressing is another critical step. Always press seams outward as you add strips, and avoid stretching the fabric. Using steam can help keep seams crisp, but make sure not to distort the block with too much heat.
Quilters often find it helpful to lay out their blocks on a design wall before joining them. This allows you to experiment with different layouts and decide which arrangement looks best for your quilt. Moving blocks around visually can reveal surprising patterns you may not have noticed while sewing.
When assembling the quilt top, take care with seam matching. Pinning at intersections ensures that lines align neatly. Patience during this stage contributes greatly to the final polished appearance of your quilt.
Finally, once the quilt top is finished, layer it with batting and backing, quilt it as desired, and bind it carefully. These final steps bring your cabin block tutorial – quilt pattern to life, transforming your blocks into a cozy and functional piece.
What size strips are best for a log cabin block?
Most quilters use strips that are 2 ½ inches wide, but you can adjust the width depending on the size of block you want to create.
Can beginners make a log cabin block?
Yes, this is one of the most beginner-friendly blocks. The repetitive steps help beginners practice accuracy while still achieving beautiful results.
What fabrics work best for this quilt pattern?
Cotton fabrics are most common because they are easy to cut and sew. However, quilters sometimes experiment with flannels or other materials for different textures.
How many blocks do I need for a full quilt?
It depends on the size of the quilt and the size of each block. For a twin-size quilt, you might need around 30–40 blocks, while a larger quilt may require more.
What is the meaning behind the red center square?
Traditionally, the red center symbolized the hearth or heart of the home, a place of warmth and family. Today, quilters use any color that speaks to them personally.
Can I mix traditional and modern fabrics in the same quilt?
Absolutely. Mixing styles and prints adds interest and gives your quilt a unique personality while still following the cabin block tutorial – quilt pattern.
The log cabin block tutorial – quilt pattern is more than just a sewing method—it is a connection to tradition, creativity, and personal expression. From its historical roots to modern variations, this block offers endless possibilities for quilters of all skill levels.
By following the steps in this article, exploring layout ideas, and applying the tips shared, you can create a quilt that is both timeless and uniquely yours. Whether you stick to traditional contrasts or embrace modern creativity, the log cabin block will always provide a solid foundation for your quilting journey.
I would love to hear your thoughts about this log cabin block tutorial – quilt pattern. Please share your honest opinion and suggestions, as your feedback helps enrich the quilting community and inspires more creativity.


