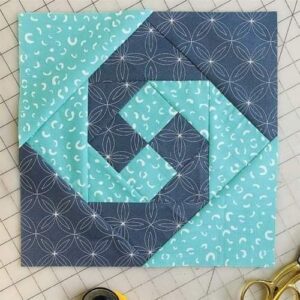
If you are searching for a fun and creative way to make a beautiful quilt, this Snail Trail Easy Block Quilt Tutorial – Free Pattern is exactly what you need. This pattern combines simplicity with stunning visual movement, making it a favorite among both beginner and experienced quilters. Whether you are sewing for yourself or as a thoughtful handmade gift, the Snail Trail Easy Block Quilt Tutorial – Free Pattern will guide you step-by-step to success.
This timeless quilt block creates a spiral effect that looks far more complicated than it really is. With a little patience and the right guidance, you can achieve a dynamic design that adds charm and sophistication to any room. Best of all, this Snail Trail Easy Block Quilt Tutorial – Free Pattern is beginner-friendly, offering a straightforward path to creating your own masterpiece.
Advertising
In this article, you will learn everything you need to know about fabric choices, cutting, assembly, and tips for finishing your quilt with professional results. Let’s dive right into this Snail Trail Easy Block Quilt Tutorial – Free Pattern and get started on your next quilting adventure!
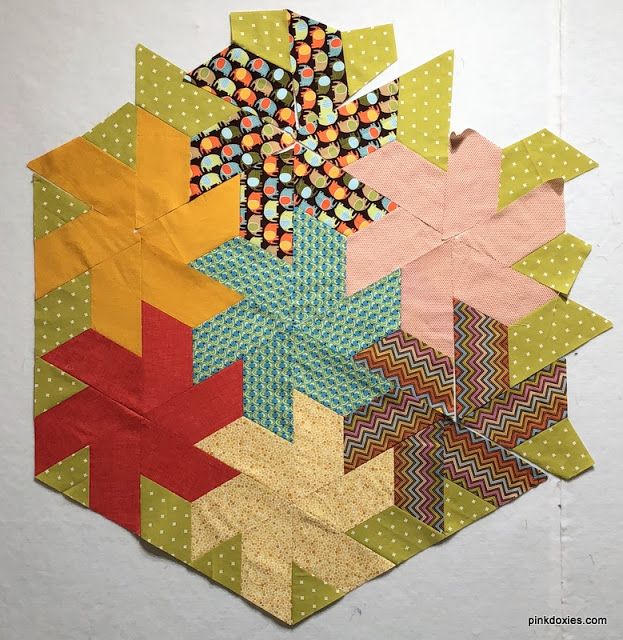
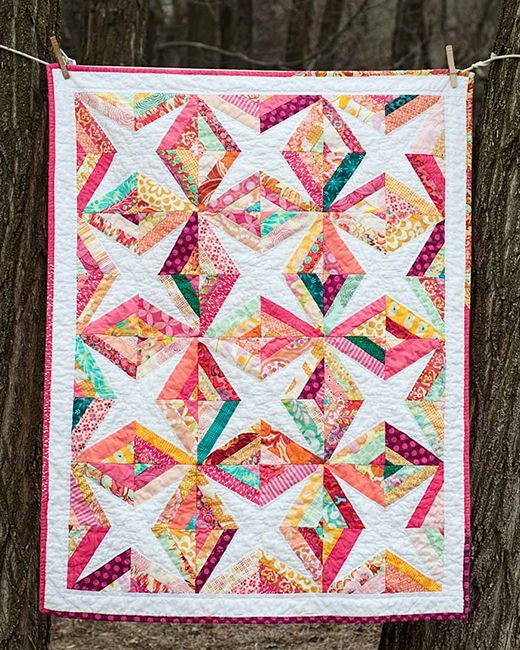
Image From Pinterest
1. Understanding the Snail Trail Easy Block Quilt Pattern
The Snail Trail Easy Block Quilt Tutorial – Free Pattern is based on a classic quilt block that features a swirling, spiral-like design. This pattern gives the illusion of movement, drawing the eye toward the center and then outward in a mesmerizing way.
This block is composed of simple geometric shapes—mainly squares and triangles—that come together to form the spiral effect. What’s amazing is that it looks intricate but is actually broken down into easy-to-follow steps.
Choosing the right fabric is essential. You can opt for contrasting colors to highlight the spiral effect or go for a more subtle look with tone-on-tone fabrics. The versatility of the Snail Trail Easy Block Quilt Tutorial – Free Pattern means you can adapt it to fit any color palette.
Advertising
The size of each block can vary depending on your project. Whether you are making a full-sized quilt, a wall hanging, or even a pillow cover, this pattern scales beautifully without losing its charm.
This block is not only beautiful but also an excellent project for practicing precision cutting and piecing. Following this Snail Trail Easy Block Quilt Tutorial – Free Pattern will help improve your quilting skills while producing a stunning result.
Additionally, this pattern is perfect for scrap-busting. You can use leftover fabric from previous projects, adding an eco-friendly and budget-conscious element to your quilting journey.
2. Materials and Tools You Will Need
To follow this Snail Trail Easy Block Quilt Tutorial – Free Pattern, you’ll need a few basic quilting materials and tools. Gathering everything beforehand will make the process smoother and more enjoyable.
First, select your fabrics. You’ll need at least two contrasting fabrics—one for the spiral and one for the background. Consider using vibrant prints or solids that make the spiral design pop.
A rotary cutter, quilting ruler, and cutting mat are essential for achieving accurate cuts. Precision is key in the Snail Trail Easy Block Quilt Tutorial – Free Pattern to ensure your blocks align perfectly.
You will also need high-quality thread in a neutral or matching color. This will help your seams blend seamlessly into the fabric, enhancing the finished look of your quilt.
A sewing machine with a ¼-inch foot is highly recommended. This foot ensures consistent seam allowances, which are crucial in quilt piecing, especially with this block’s geometric construction.
Pins or fabric clips will keep your pieces together as you sew. Accuracy in pinning prevents your fabric from shifting and keeps your spiral aligned.
Lastly, prepare your ironing tools. Pressing each seam as you go is vital for a crisp, professional finish. A good iron can make a noticeable difference in the outcome of your Snail Trail Easy Block Quilt Tutorial – Free Pattern.
3. Step-by-Step Guide to Making the Snail Trail Block
The heart of this Snail Trail Easy Block Quilt Tutorial – Free Pattern lies in understanding how to construct the block. Follow these steps to achieve the classic swirling design.
Start with a center square. This is the foundation of the snail trail block. Cut your first square from your darker or feature fabric to serve as the focal point.
Add the first round of triangles. Cut two squares from your background fabric, then cut them diagonally to create four triangles. Attach these triangles to the center square, creating a larger square.
Trim your block after each round. Keeping your block squared up ensures that the spiral remains balanced and neat. This is a key tip in the Snail Trail Easy Block Quilt Tutorial – Free Pattern.
Add the second round of triangles, this time using your feature fabric. Again, cut two squares, slice them diagonally, and sew the triangles to each side of the growing block.
Repeat this process, alternating between background and feature fabrics. Each round increases the block’s size while enhancing the spiral effect that characterizes the snail trail.
Ensure that all seams are pressed after every addition. Pressing toward the darker fabric prevents shadowing and creates a flat, smooth block, essential for the success of your Snail Trail Easy Block Quilt Tutorial – Free Pattern.
4. Assembling the Quilt and Finishing Touches
Once you’ve created multiple snail trail blocks following the Snail Trail Easy Block Quilt Tutorial – Free Pattern, it’s time to assemble them into a full quilt.
Lay out your blocks in the desired order. You can arrange them in a traditional grid or experiment with different layouts to create a more modern or dynamic look.
Join the blocks row by row. Sew each block together using a consistent ¼-inch seam allowance. Pay close attention to how the spirals interact with each other across the quilt top.
After sewing the rows, join them together to complete the quilt top. This is a satisfying stage where your quilt really starts to take shape following the Snail Trail Easy Block Quilt Tutorial – Free Pattern.
Add borders if desired. A border can frame the quilt beautifully and add extra size if needed. Choose a fabric that complements your block colors for the best result.
Prepare your quilt sandwich by layering the quilt top, batting, and backing fabric. Use safety pins or basting spray to hold the layers together securely.
Finish by quilting and binding. You can quilt simple straight lines, echo the spiral shapes, or choose free-motion quilting designs. Attach your binding, and your Snail Trail Easy Block Quilt Tutorial – Free Pattern project is complete and ready to be enjoyed!
What is the easiest way to start the Snail Trail block? Begin with an accurately cut center square. Precision at the start makes every following step easier and keeps the spiral balanced.
Can beginners try the Snail Trail Easy Block Quilt Tutorial – Free Pattern? Absolutely! This pattern looks complex but is broken down into manageable steps, making it perfect for beginners who are ready for a fun challenge.
What size can the Snail Trail block be? The size is flexible. You can make small blocks for table runners or large blocks for bed-sized quilts. Simply adjust the number of rounds you add.
How much fabric do I need for one block? For one block, you’ll need small cuts of two fabrics. Typically, fat quarters are more than enough, but yardage depends on your overall quilt size.
Do I need special quilting tools? While basic quilting tools like a rotary cutter, ruler, and sewing machine are essential, there are no special tools required specifically for this pattern.
Can I make this quilt with scrap fabric? Yes! The Snail Trail Easy Block Quilt Tutorial – Free Pattern is perfect for using scraps. Mixing different prints can add a fun, eclectic vibe to your quilt.
The Snail Trail Easy Block Quilt Tutorial – Free Pattern offers an engaging, rewarding, and creative quilting experience. Despite its intricate appearance, this quilt block is surprisingly accessible, making it suitable for all skill levels. By following this detailed tutorial, you’ve learned how to select fabrics, cut accurately, piece the blocks, and assemble your quilt with care and precision.
I hope this guide has inspired you to try this beautiful quilting pattern. If you’ve enjoyed this tutorial or have any suggestions, please leave your honest opinion and share your thoughts in the comments. Your feedback is very important and helps improve future tutorials. Happy quilting!


