
PATCHWORK BAG - Quilt Pattern

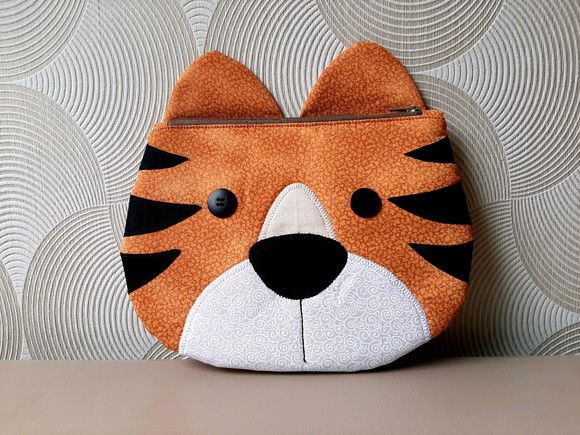
If you’re looking for a bold and unique quilting project, the Tiger Quilt Pattern Toiletry Bag Quilt Pattern might be exactly what you need. Combining the fierce beauty of a tiger motif with the practicality of a handmade toiletry bag, this project is not only functional but also a creative outlet for quilters of all levels. Whether you’re an experienced quilter or just starting out, creating a toiletry bag using a tiger-inspired quilt design can be both fun and rewarding.
The appeal of the Tiger Quilt Pattern Toiletry Bag Quilt Pattern lies in its ability to turn a simple everyday item into a piece of art. The bold stripes, expressive eyes, and powerful imagery associated with tigers can be captured in fabric form using piecing, appliqué, or even free-motion quilting techniques. Not only does this bring personality to your travel accessories, but it also allows for endless customization.
When you take the time to sew your own toiletry bag quilt pattern with a unique tiger theme, you’re creating a gift-worthy item that also shows off your sewing skills. With the right choice of fabric and structure, your quilted bag can be sturdy, washable, and durable—perfect for travel or everyday bathroom storage.
The Tiger Quilt Pattern is eye-catching, powerful, and symbolic. Tigers represent strength, confidence, and independence—traits that resonate with crafters and creators alike. Integrating such a meaningful symbol into a small but practical project like a toiletry bag is a brilliant way to bring creativity into everyday routines.
Many quilters are drawn to animal-themed designs, but the tiger motif offers something extra: dramatic contrast, bold symmetry, and wild energy. These design elements look amazing when translated into fabric through quilting techniques.
When you incorporate the Tiger Quilt Pattern into a Toiletry Bag Quilt Pattern, you get a portable piece of art. This pattern is perfect for gift-giving, especially for loved ones who appreciate wildlife, adventure, or handmade items.
Another reason to choose a tiger theme is that it adapts well to different color palettes. While orange and black are traditional, you can experiment with whites, blues, or even stylized multicolor tigers for a modern twist.
Using pre-cut fabric squares or fat quarters can make the assembly of the Toiletry Bag Quilt Pattern faster and more enjoyable. Choose prints that mimic fur or feature jungle elements for an extra touch of wilderness.
Even beginner quilters can try this project by using simple blocks to frame a tiger appliqué, making it accessible while still visually impactful.
To create a stunning Tiger Quilt Pattern Toiletry Bag Quilt Pattern, start by gathering the necessary tools and supplies. The right materials will make the process smoother and ensure a quality finished product.
Basic materials include cotton quilting fabric, fusible interfacing, batting, a zipper (or snap closure), and thread in matching or contrasting colors. Choose high-quality fabric to increase the longevity of your toiletry bag.
For the tiger design, you can either use a pre-made tiger quilt block or create your own using appliqué techniques. Some quilters prefer to paper-piece intricate animal designs, which can also be adapted here.
The right batting is important—it adds structure and softness. Choose a thin, fusible batting if you want the bag to be more flexible, or a thicker option for a sturdier shape.
A sewing machine with a walking foot can help maintain even layers, especially when quilting your tiger motif into the panels. Hand-sewing is also an option for decorative elements or final touches.
You’ll need cutting tools like a rotary cutter, self-healing mat, and quilting ruler to ensure precision. For detailed tiger features, small embroidery scissors and fabric markers can come in handy.
Lastly, don’t forget the lining. A waterproof or wipe-clean fabric is ideal for the inside of a toiletry bag, keeping it clean and practical for daily use.
When designing your Tiger Quilt Pattern Toiletry Bag Quilt Pattern, it helps to sketch your idea first. Visualizing where the tiger face or stripes will appear ensures better balance and aesthetic appeal.
Start with quilting your front and back panels. This is where the tiger element comes to life. You can piece together fabrics in tiger stripe patterns or use appliqué to feature a tiger face in the center of the panel.
Once your panels are quilted, you’ll move on to assembling the bag. Cut and sew your fabric pieces using your template. Add your quilted tiger panels as the outer fabric, sandwiching them with batting and lining.
Sew the zipper onto the top edge, ensuring it aligns properly with both the front and back pieces. Zippers can be intimidating, but taking your time ensures a clean, professional look.
Sew the side seams, leaving a small opening in the lining for turning. Once the bag is inside-out and shaped properly, hand-stitch the lining closed.
Add decorative stitches, fabric tags, or personalized embroidery to make your bag one-of-a-kind. This can include the name of the recipient or a small paw print motif.
Take a moment to quilt additional textures or borders around the tiger to enhance visual appeal and structural integrity.
One of the joys of working with a Tiger Quilt Pattern Toiletry Bag Quilt Pattern is that the project can be highly personalized. From fabric choices to embellishments, each detail can reflect your unique taste.
Choose bright and bold colors for a dramatic look, or go with neutrals for a more subtle effect. Add metallic thread or sequins to make the tiger design pop.
Use different quilting techniques like free-motion quilting or echo quilting to create movement and texture in the tiger’s fur or background.
Make a set of toiletry bags in different sizes using the same tiger theme. These make perfect travel companions or handmade gifts for birthdays, holidays, or graduations.
Incorporate other elements into your quilted bag like a detachable wrist strap, extra interior pockets, or a foldable design for compact storage.
Consider turning your finished Tiger Quilt Pattern into a larger set—such as a matching pouch, makeup bag, or even a quilted journal cover with the same motif.
Each quilted piece you create adds to your collection of handmade items and showcases your evolving skills in both design and construction.
What skill level is required for the Tiger Quilt Pattern Toiletry Bag Quilt Pattern?
This project is suitable for confident beginners to intermediate quilters. Basic knowledge of quilting and bag construction is helpful, but not required with the right guidance.
Can I use a pre-made tiger panel instead of making my own?
Absolutely! Using a pre-made tiger quilt block or printed panel saves time and still delivers a beautiful result.
What size should the finished toiletry bag be?
Standard sizes vary, but a common finished measurement is approximately 9″ x 5″ x 3″. However, you can adjust dimensions to suit your needs.
Which fabric is best for the interior lining?
Water-resistant or laminated cotton is ideal for lining, especially if the bag will carry liquids or toiletries. Quilting cotton can be used with added interfacing.
How do I care for the finished quilted bag?
Spot clean or hand wash with mild detergent. If machine washing, use a gentle cycle and allow it to air dry to maintain its shape.
Can I sell bags made with the Tiger Quilt Pattern?
Yes, if you design your own pattern or have permission to use a commercial pattern for resale. Always respect copyright and licensing terms.
The Tiger Quilt Pattern Toiletry Bag Quilt Pattern offers the perfect blend of artistic flair and practical use. From selecting fabrics that echo the wild beauty of a tiger to piecing together a sturdy and elegant bag, this project encourages creativity, patience, and craftsmanship. Whether you’re gifting it to someone special or using it as your own daily essential, your handmade toiletry bag will stand out as a unique and memorable piece.
We hope this guide has inspired you to bring your own version of the Tiger Quilt Pattern Toiletry Bag Quilt Pattern to life. If you’ve tried this pattern or plan to start, we’d love to hear your honest feedback and suggestions. Your insights help us grow and improve future tutorials for creative makers like you!
