
Summer-Country-Star-Flower - Quilt Pattern
If you are searching for a Paper bag tutorial in English – Quilt Pattern, you have just arrived at the right place. Many quilting enthusiasts are always looking for creative projects that combine practicality with artistry, and this specific tutorial offers both. Not only will you learn how to make a functional quilted paper bag, but you will also enjoy a project that is simple, stylish, and customizable to your taste.
The beauty of working on a quilt pattern that mimics the charm of a paper bag is that it blends traditional patchwork skills with a modern, eco-friendly concept. Whether you are a beginner or an experienced quilter, this project allows you to experiment with fabrics, textures, and quilted designs while creating something useful for everyday life.
In this Paper bag tutorial in English, we will explore step-by-step instructions, tips for selecting fabrics, sewing techniques, and finishing touches to make your project a success. Throughout this article, you will find a structured and easy-to-follow approach, ensuring that the final result is both durable and visually appealing.
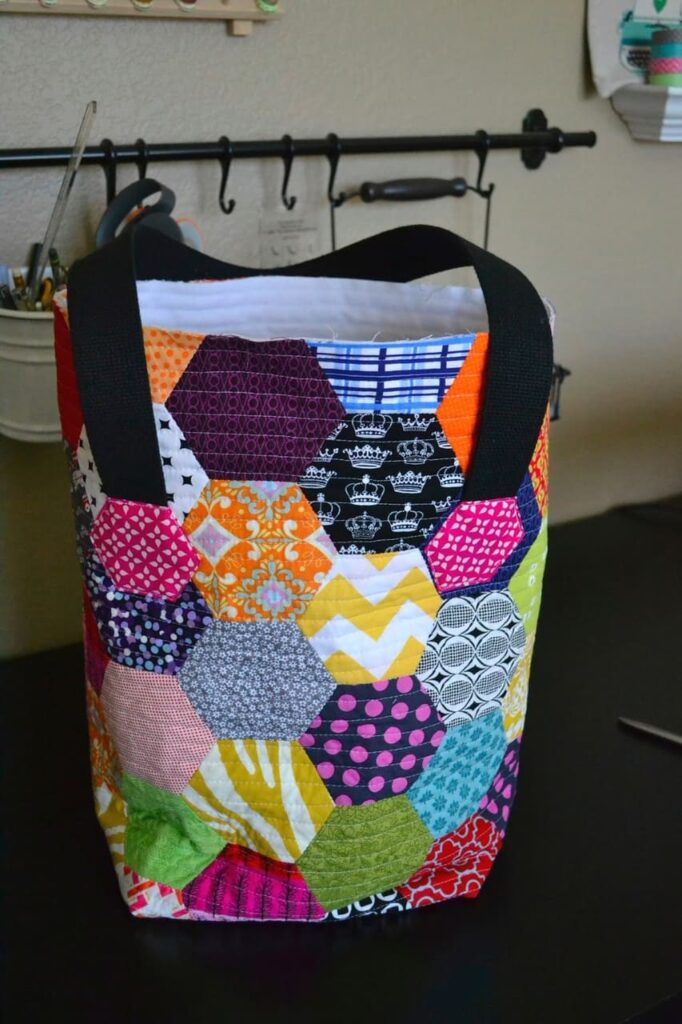
The first step in creating a Paper bag tutorial in English – Quilt Pattern is understanding what makes this design unique. Unlike ordinary tote bags, the paper bag quilt style focuses on simplicity and structure. The inspiration comes from the everyday paper bag shape, which is transformed into a durable and stylish quilted version.
When you start this project, you should think about the size you want your bag to be. The quilt pattern can be adjusted to small, medium, or large bags, depending on your needs. This flexibility is what makes it so appealing. You can create a small bag for carrying accessories or a larger version for groceries or sewing supplies.
Another key element of this quilt pattern is fabric selection. Using cotton fabrics, recycled scraps, or colorful fat quarters gives the bag character. Patchwork lovers can use different blocks, while minimalists may prefer a solid color with detailed quilting.
A common question when following a Paper bag tutorial in English is whether it requires advanced sewing skills. The answer is no. Beginners can follow the simple steps and still achieve excellent results, while advanced quilters can add more detailed quilting designs or embellishments.
The pattern’s appeal is also in its versatility. You can leave the bag plain, quilt it with geometric lines, or experiment with free-motion quilting. Each choice gives your bag a new identity, making it a reflection of your personal creativity.
Lastly, understanding this pattern is about appreciating its balance of function and beauty. A quilted paper bag is strong, reusable, and eco-conscious while maintaining the soft, handmade charm of quilting.
Before starting your Paper bag tutorial in English – Quilt Pattern, gathering the right materials and tools is crucial. This preparation ensures your sewing process flows smoothly and reduces mistakes.
The primary material is fabric. Cotton fabric is the most recommended choice because it is easy to sew, durable, and available in countless colors and prints. You can choose a patchwork style with multiple fabrics or a simpler look with just one fabric type.
Next, you will need batting or fusible interfacing. This adds structure and strength to your quilted paper bag, preventing it from collapsing like an ordinary paper bag. Batting also provides that soft quilted effect that quilters love.
Thread is another essential item. Choose a high-quality cotton or polyester thread that matches or contrasts with your fabric, depending on the style you want. A strong thread ensures your quilt pattern bag lasts through repeated use.
For tools, a rotary cutter, self-healing cutting mat, and quilting ruler are highly recommended. They allow you to cut precise fabric pieces that align perfectly when sewing. Accuracy in cutting translates into a professional-looking final product.
A sewing machine with a quilting foot is also helpful. While hand-sewing is possible, using a machine speeds up the process and gives you cleaner, stronger stitches. If you enjoy hand-quilting, you can still add personal touches afterward.
Finally, don’t forget basic supplies like scissors, pins, or fabric clips, and an iron for pressing seams. Pressing each step of your quilt pattern ensures neat, crisp edges that elevate the final look of your bag.
Once your materials are ready, the real fun begins with the Paper bag tutorial in English – Quilt Pattern sewing process. Following clear steps will help you stay organized and achieve beautiful results.
Start by cutting your fabric pieces. For a medium-sized bag, cut two large rectangles for the front and back, and two smaller ones for the sides. Don’t forget to cut the bottom panel. Cut matching pieces of batting for each fabric piece.
Layer the fabric and batting, then quilt them together. This is where you can experiment with quilting designs. Simple straight lines are perfect for beginners, while free-motion quilting adds artistic flair. Quilting secures the batting and fabric, giving your bag durability and a decorative look.
Next, sew the panels together. Start with the sides, then attach the bottom piece. Carefully align the edges to avoid uneven seams. This step forms the basic shape of your paper bag.
To add more strength, topstitch the seams. This gives the bag a clean finish while reinforcing the structure. Topstitching is especially important for a bag meant to carry heavier items.
Create the handles by sewing two strips of fabric, turning them inside out, and quilting them for strength. Attach the handles securely to the top of the bag, ensuring they are evenly spaced for balance.
Finally, bind the top edge of the bag with bias tape or a folded strip of fabric. This neatens the edge and gives your quilt pattern project a polished, professional look.
The Paper bag tutorial in English – Quilt Pattern is more than just following instructions; it’s about adding your own creative personality. Customization makes each bag unique and enjoyable to use.
One of the best ways to personalize your quilt pattern bag is through fabric selection. Choose fabrics that reflect your style, from floral prints to bold geometric patterns. Combining light and dark shades creates striking visual effects.
Adding pockets inside or outside the bag is another useful customization. Quilted pockets can hold small items such as keys, phones, or sewing supplies. They add functionality without complicating the design.
Embroidery or appliqué is also a wonderful way to personalize. Stitching initials, motifs, or decorative patches onto your quilt pattern bag transforms it into a one-of-a-kind accessory.
Don’t hesitate to play with different quilting patterns. While straight-line quilting is classic, diagonal lines, diamond shapes, or free-motion designs bring depth and texture to the bag. Each variation tells a different story.
Handles can also be customized. Instead of standard fabric handles, you can use leather straps, braided fabric strips, or even recycled belts. This adds both durability and character.
Finally, think about the purpose of your bag. If you need a shopping tote, make it larger and sturdier. If you want a fashion accessory, focus more on stylish fabrics and embellishments. Your imagination is the limit.
1. Is the Paper bag quilt pattern suitable for beginners?
Yes, this tutorial is beginner-friendly. The steps are simple, and even new quilters can follow along successfully.
2. What fabrics work best for this quilt pattern?
Cotton fabrics are the best choice because they are durable, easy to quilt, and available in endless styles.
3. Can I make the bag without a sewing machine?
Yes, hand-sewing is possible, though it requires more time. A sewing machine makes the process faster and provides stronger seams.
4. How do I wash my quilted paper bag?
It is best to wash it gently by hand or on a delicate machine cycle. Air drying is recommended to preserve its shape.
5. Can I resize the quilt pattern bag?
Absolutely. You can scale the measurements to create a small handbag, medium tote, or large shopping bag.
6. How can I make my bag more durable?
Using quality thread, strong quilting stitches, and adding interfacing or batting will ensure your bag lasts longer.
The Paper bag tutorial in English – Quilt Pattern is a perfect project for quilters who love combining function with creativity. It allows you to practice quilting techniques, experiment with fabrics, and create something both practical and stylish. With step-by-step instructions, customization ideas, and tips for durability, this project offers endless opportunities for creative expression.
I hope this tutorial has inspired you to try making your own quilted paper bag. If you do, I would love to hear your honest opinion and any suggestions you may have. Your feedback helps improve future tutorials and keeps the quilting community thriving with new ideas.


