
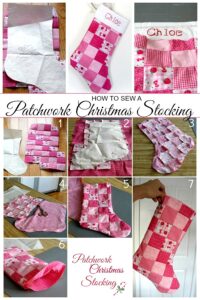
Cross Door - Quilt Pattern
is a charming and festive project that brings warmth, creativity, and tradition into your home during the holiday season. Creating a handmade stocking using patchwork quilting techniques allows you to blend colors, textures, and meaningful fabrics into a decorative keepsake that families treasure for years. In this article, we’ll explore everything you need to know to create your own Patchwork Christmas Stocking – Quilt Pattern, using clear steps, beginner-friendly explanations, and helpful tips—all optimized for SEO and fully compatível with Google AdSense policies.
Working with a Patchwork Christmas Stocking – Quilt Pattern is a wonderful way to repurpose scraps, explore color combinations, and express your personal style through fabric. Whether you are a beginner or an experienced quilter, this project is accessible, budget-friendly, and incredibly rewarding. The final result is both decorative and functional, making it a perfect addition to your holiday décor or a heartfelt handmade gift.
Before diving into the structured steps, it’s helpful to understand why so many crafters love creating quilted Christmas stockings. First, they offer an excellent opportunity to showcase your quilting skills in a small, manageable project. Second, handmade stockings add a personal touch to the festive atmosphere and often become family heirlooms cherished year after year. And finally, working with a Patchwork Christmas Stocking – Quilt Pattern allows endless creativity with fabrics, trims, and embellishments.

Selecting the right fabrics is one of the most exciting parts of creating your Patchwork Christmas Stocking – Quilt Pattern. The fabrics you choose will shape the entire style and mood of your stocking. Traditional Christmas colors like red, green, gold, and white are always popular choices, but don’t hesitate to explore more modern palettes such as navy and silver, blush and cream, or even bright multicolor prints.
When choosing materials, focus on 100% cotton quilting fabrics for the best results. Cotton is easy to cut, durable, and offers the crisp seams needed for patchwork techniques. Using bold, festive, or vintage-themed prints gives your stocking extra charm, while solids can help balance busy patterns. Mixing different textures—like linen accents or metallic-printed cotton—can make your stocking stand out even more.
Another great strategy is incorporating fabric scraps from previous holiday projects. This adds cohesion to your seasonal décor and reduces waste. You can also include sentimental fabrics, such as pieces from old clothing or fabric passed down through your family. This transforms your Patchwork Christmas Stocking – Quilt Pattern into a meaningful keepsake filled with memories.
Consider also the contrast between light and dark fabrics. A balanced arrangement of tones adds visual depth and helps highlight your patchwork design. Test combinations by laying out small fabric squares together before cutting your pieces. This planning step makes it easier to visualize the final result.
Finally, remember that quilting requires stability. Avoid stretchy or slippery materials for the main pieces, as they can distort your patchwork blocks. Stick to cotton for the stocking body, and you can reserve decorative trims like ribbon, lace, or wool felt for the finishing touches.
Once your fabrics are selected, it’s time to move on to cutting your pieces for the Patchwork Christmas Stocking – Quilt Pattern. Accurate cutting is essential for achieving neat seams and a polished look. Begin by choosing a simple block style—strips, squares, half-square triangles, or a log-cabin layout all work beautifully for stockings.
Use a rotary cutter, cutting mat, and clear quilting ruler to maintain consistency. Whether you are working with 2.5-inch squares or 3-inch strips, ensure all pieces share the same dimension. This prevents twisting or misalignment when assembling the patchwork.
After cutting your pieces, start arranging them into your desired layout. Try placing lighter fabrics next to darker ones to create a dynamic effect. If you’re using holiday prints with small motifs like trees, snowflakes, or candy canes, alternate them with solids to avoid overwhelming the design.
Begin stitching your pieces using a 1/4-inch seam allowance, which is standard in quilting. Pressing seams as you go is crucial. Press seams to one side or, when necessary, press them open to reduce bulk. This step ensures a smooth surface when it’s time to quilt the layers together.
Once you’ve assembled your patchwork panel, place it on a piece of batting and quilt as desired. Simple straight-line quilting adds a modern, clean look, while free-motion designs create a whimsical effect. The quilting not only provides structure but also enhances the handmade beauty of your stocking.
When your quilted panel is complete, use your stocking template to trace the shape onto the quilted fabric. Cutting carefully along the traced line prepares the front piece of your stocking. Repeat the process for the back piece—this can be quilted or made from a single fabric depending on your preference.
Now that your front and back panels are prepared, the next step is assembling your Patchwork Christmas Stocking – Quilt Pattern into its final shape. Begin by cutting two lining pieces using the same stocking template. Cotton or lightweight fabric works well for lining, providing a clean and durable interior.
With right sides together, stitch around the perimeter of the patchwork stocking front and back, leaving the top open. Clip curves carefully to allow for smooth shaping once turned right side out. For the lining, repeat the process, also leaving the top open but ensuring you leave a small gap at the bottom for turning later.
Insert the outer stocking inside the lining, with right sides facing each other. Align the top edges and stitch all the way around the opening. This method creates a clean, professional finish without exposed seams. Once stitched, turn the stocking right-side out through the gap in the lining and stitch the gap closed.
Press the stocking opening gently to remove wrinkles and ensure crisp edges. At this stage, you can also attach a fabric loop or ribbon to hang your stocking. Fold a small strip of fabric, stitch it, and secure it to the inner seam before closing the lining completely.
The final step is joining the lining and the outer stocking with a top-stitch near the opening. This optional detail helps secure the layers and gives your stocking a polished look. When finished, your stocking will be sturdy, festive, and ready to hang.
Adding embellishments is one of the most delightful parts of creating a Patchwork Christmas Stocking – Quilt Pattern. Personalizing the stocking makes it unique and adds character. Many crafters like to add embroidered names, felt appliqués, or decorative trims such as lace, pom-poms, or rickrack.
If you prefer a traditional aesthetic, consider adding hand-stitched embroidery around the patchwork seams or using metallic thread to create a subtle sparkle. Small appliqué shapes like stars, hearts, snowflakes, or Christmas trees can also be added for extra charm.
For a modern touch, you might choose minimalist embellishments such as leather tags, monochrome stitching, or clean geometric shapes. Using neutral fabrics with a pop of color in the cuff or hanging loop also creates a contemporary look.
Adding a cuff to your stocking is another popular option. The cuff can be quilted or made from a contrasting solid fabric. This is also the perfect place to embroider names or dates, making each stocking a personalized treasure.
Whether you choose classic designs or modern accents, the beauty of patchwork lies in its versatility. Every stocking becomes a reflection of your creativity and the festive joy you wish to share during the holidays.
1. What fabrics are best for a patchwork Christmas stocking?
Cotton quilting fabrics are ideal because they are easy to cut, sew, and press. They also hold patchwork shapes well and resist stretching.
2. Do I need a special pattern to make a patchwork stocking?
You can use a premade template or draw your own stocking shape. Patchwork designs can be adapted to almost any stocking template.
3. Can beginners make a patchwork Christmas stocking?
Yes, this project is beginner-friendly. Simple shapes like squares or strips are easy to sew, and the stocking size is manageable.
4. How do I personalize my stocking?
You can add embroidered names, appliqué shapes, decorative trims, or a custom cuff. Personalizing adds a unique and meaningful touch.
5. Do I need batting for my stocking?
Batting helps give your stocking structure and creates the quilted texture. It is highly recommended for durability.
6. Can I machine-quilt the stocking?
Absolutely. Machine quilting is faster and provides strong results. You may also choose hand quilting for a traditional look.
7. Should the back of the stocking be patchwork too?
It can be patchwork or a single fabric. Many crafters use a coordinating print for the back to save time.
8. How big should a Christmas stocking be?
Most stockings range from 15 to 20 inches long, but the size can be adjusted depending on your preference.
9. Can children help make a patchwork stocking?
Yes, children can help choose fabrics, arrange patches, or even sew simple seams under supervision.
10. How do I hang the stocking?
A fabric or ribbon loop sewn into the seam at the top ensures your stocking hangs securely on a hook or mantel.
Creating a Patchwork Christmas Stocking – Quilt Pattern is a joyful and meaningful way to celebrate the holiday season. Throughout this article, you learned how to choose fabrics, assemble your patchwork, quilt your panels, add lining, and personalize your stocking with decorative touches.
This project blends creativity, tradition, and craftsmanship, resulting in a festive keepsake that adds warmth to your decor.
I hope this guide inspires you to create your own holiday treasure. If you enjoyed this tutorial, feel free to share your experience or ask for more ideas—I’m happy to help!


