
Cross Door - Quilt Pattern
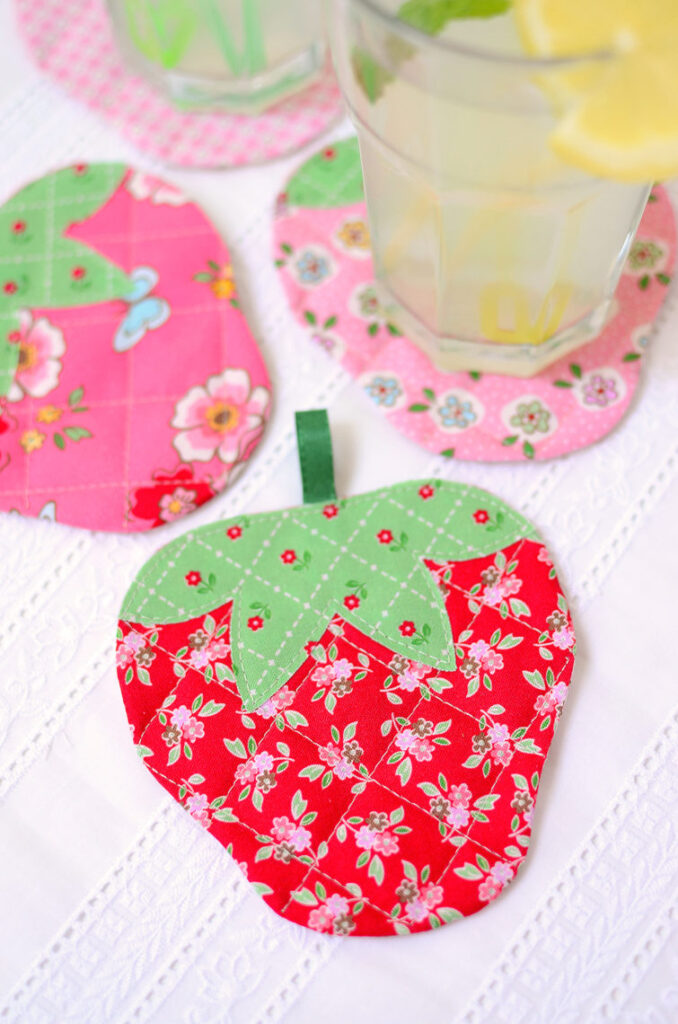
If you are looking for a fun and practical sewing project, this Quilted Strawberry Coaster Tutorial – Quilt Pattern is the perfect choice. Not only does it brighten up your home décor with a touch of fruity charm, but it also allows you to explore essential quilting skills in a small and manageable format. This project is ideal for beginners who want to practice their piecing and quilting techniques, as well as for experienced quilters searching for a quick and creative idea.
The beauty of the Quilted Strawberry Coaster Tutorial – Quilt Pattern lies in its combination of functionality and design. You will be creating a coaster that looks like a sweet strawberry while also serving as a useful protector for your table surfaces. It is a project that blends creativity with practicality, making it a favorite among crafters of all skill levels. By the end of this tutorial, you will have a set of adorable strawberry-shaped coasters that can be gifted to friends or used in your own kitchen.
In addition to being fun, this tutorial provides an excellent opportunity to learn more about fabric selection, cutting techniques, quilting methods, and finishing touches. Whether you are working with scrap fabrics or buying fresh materials specifically for this project, the Quilted Strawberry Coaster Tutorial – Quilt Pattern will help you expand your skills and enjoy the process of crafting something unique and charming.
Before starting your Quilted Strawberry Coaster Tutorial – Quilt Pattern, it is important to gather all the necessary supplies. This ensures that your process runs smoothly and you can focus entirely on the creative aspect of quilting. For this project, you will only need small amounts of fabric, batting, and basic sewing tools, making it a cost-effective project as well.
First, choose red or pink fabric to represent the body of the strawberry. You may opt for a solid fabric, but patterned fabrics with tiny dots or floral prints can mimic strawberry seeds beautifully. For the leaves, select a fresh green fabric that contrasts nicely with the red base. Having a playful mix of textures can add depth and interest to your design.
Next, prepare a piece of batting to give your coaster thickness and durability. The batting will provide the quilted look while ensuring your coaster protects surfaces from heat and moisture. Thin cotton batting works best for small projects like this.
You will also need a rotary cutter or sharp scissors to cut your fabric pieces into the strawberry shape. A fabric marker or chalk pencil can be useful for tracing templates, and quilting pins will help hold your layers together securely during sewing.
A sewing machine is highly recommended for this project, although it can also be stitched by hand if you prefer a slower, more meditative approach. Make sure your machine has a sharp needle suitable for quilting. Choosing a red or green thread that matches your fabrics will create a cohesive and polished finish.
Finally, prepare your work surface by ironing the fabrics beforehand. Pressed fabrics are easier to cut and sew, ensuring cleaner lines and a more professional result. With your materials in place, you are ready to begin your Quilted Strawberry Coaster Tutorial – Quilt Pattern.
The next step in the Quilted Strawberry Coaster Tutorial – Quilt Pattern is cutting and shaping your fabrics into the iconic strawberry form. Begin by sketching or printing a simple strawberry outline on paper. This template will serve as a guide for tracing and cutting your fabric.
Place your template over the red fabric and trace carefully using fabric chalk. Cut out two identical strawberry shapes for the front and back of the coaster. These pieces will sandwich the batting and create the structure of your coaster.
For the leafy top, use the same template but modify the upper portion into a leafy crown shape. Cut this part from the green fabric. If you would like a fuller look, consider cutting two leaf layers and stitching them together for added detail.
Once you have your fabric pieces, cut a piece of batting slightly smaller than the strawberry shape. This helps reduce bulk in the seams and ensures smooth edges after stitching. The batting should fit neatly inside without extending beyond the fabric edges.
Pin your fabric and batting layers together, placing the batting in between the two red strawberry shapes. Position the green leaf piece at the top, aligning it so it peeks out like a real strawberry stem. This arrangement prepares the coaster for quilting.
At this stage, take a moment to check your shapes and adjust any uneven cuts. Clean and precise shapes will make sewing easier and give your Quilted Strawberry Coaster Tutorial – Quilt Pattern a neat, professional finish.
Quilting is what gives this project its charm, and in the Quilted Strawberry Coaster Tutorial – Quilt Pattern, this step is both practical and decorative. Begin by securing your fabric sandwich with pins or clips to prevent shifting while sewing.
Start quilting by stitching through all the layers in a pattern that mimics strawberry seeds. Small diagonal or crosshatch lines work well, but you can also use free-motion quilting if you feel confident. Decorative stitches in contrasting thread colors can highlight the strawberry texture beautifully.
After quilting the main body, focus on the leaf section. Simple veins can be stitched into the green fabric to add dimension and realism. This detail elevates the design, making your coaster not only functional but also visually engaging.
Trim away any excess batting or fabric along the edges after quilting. This ensures smooth seams when you sew the coaster together. At this stage, you should already see your project coming to life with a clear strawberry appearance.
Next, sew around the perimeter of the coaster, leaving a small opening at the side if you prefer to turn the coaster inside out. Alternatively, you can use binding to encase the edges, which creates a polished frame around your coaster.
Once the edges are finished, press your coaster with an iron to flatten any wrinkles and give it a crisp look. Your Quilted Strawberry Coaster Tutorial – Quilt Pattern is now nearly complete, and you are ready to add final details.
The last step in the Quilted Strawberry Coaster Tutorial – Quilt Pattern is to add finishing touches and explore creative variations. This is where you can personalize your coasters and make them truly unique.
One idea is to use embroidery floss to stitch tiny seeds across the strawberry body. Yellow or white thread works well for this detail and adds a playful touch to the design. Hand embroidery also gives the coaster a handmade charm that many quilters enjoy.
If you want your coasters to be slightly larger or more decorative, consider adding a fabric border. A polka-dot or gingham print border can enhance the strawberry theme while making the coaster more durable.
Another fun option is to create a set of coasters in different fruit shapes, such as apples, lemons, or watermelons. This allows you to practice the same quilting techniques while building a colorful collection of fruit-inspired coasters.
For gift-giving, you can tie a set of these strawberry coasters with a ribbon and present them as a handmade surprise. They make wonderful housewarming gifts, summer party favors, or thoughtful tokens for friends and family.
Lastly, don’t forget to label your creation if you like. Many quilters enjoy adding a small tag or embroidered initials on the back, giving their project a signature touch. This makes your Quilted Strawberry Coaster Tutorial – Quilt Pattern not only practical but also a personal piece of art.
1. Is this project suitable for beginners?
Yes, the Quilted Strawberry Coaster Tutorial – Quilt Pattern is perfect for beginners. It uses small pieces of fabric and simple quilting methods, making it easy to follow while providing great practice.
2. What type of batting is best for this project?
Thin cotton batting is ideal because it provides structure without making the coaster too bulky. It also ensures that stitching remains smooth and easy.
3. Can I make these coasters using only hand sewing?
Absolutely. While a sewing machine speeds up the process, hand sewing can work perfectly well, especially for those who enjoy slower stitching.
4. How do I wash quilted coasters?
These coasters can be gently hand-washed or machine-washed on a delicate cycle. Always air-dry them flat to maintain their shape.
5. Can I use scrap fabrics for this tutorial?
Yes, this is a fantastic scrap-busting project. Small leftover fabrics work wonderfully, especially if you want to mix prints and colors for a unique look.
6. How many coasters should I make for a set?
A typical set includes four to six coasters, but you can create as many as you like depending on your needs or the occasion.
The Quilted Strawberry Coaster Tutorial – Quilt Pattern is a delightful project that combines quilting skills with creativity and practicality. From choosing fabrics to adding final touches, every step brings you closer to a finished product that is both beautiful and functional. Whether you keep them for yourself or give them as gifts, these strawberry-shaped coasters will brighten up any table.
I hope this tutorial has inspired you to try making your own Quilted Strawberry Coaster Tutorial – Quilt Pattern. If you enjoyed this guide, please share your honest opinion and suggestions. Your feedback is always welcome and helps me create even better tutorials for the quilting community.


