
Cross Door - Quilt Pattern
The Rainbow small – Patchwork tablecloth braid – Quilt Pattern is a joyful and colorful project that combines creativity, technique, and a touch of handmade charm. This pattern celebrates the vibrant beauty of patchwork quilting, using braids of fabric that resemble a woven rainbow. It’s perfect for those who love small, detailed sewing projects that add a cheerful accent to their home decor. Whether you are a beginner or an experienced quilter, this tutorial will help you create a stunning tablecloth that captures the light and spreads happiness across any room.
Working with patchwork is one of the most satisfying aspects of quilting. The Rainbow small – Patchwork tablecloth braid – Quilt Pattern allows you to mix colors, prints, and textures in endless combinations. Each piece contributes to a larger, harmonious design, symbolizing unity and creativity. This pattern’s simplicity is balanced with the precision required to form the braided effect — an elegant yet approachable challenge for crafters of all levels.
The braid technique used in this pattern adds a dynamic flow to your project. It creates visual movement across the tablecloth, enhancing its artistic appeal. Whether you choose bold rainbow hues or soft pastel shades, this design transforms your fabric scraps into a masterpiece of texture and color. Let’s explore how to bring this beautiful Rainbow small – Patchwork tablecloth braid – Quilt Pattern to life step by step.
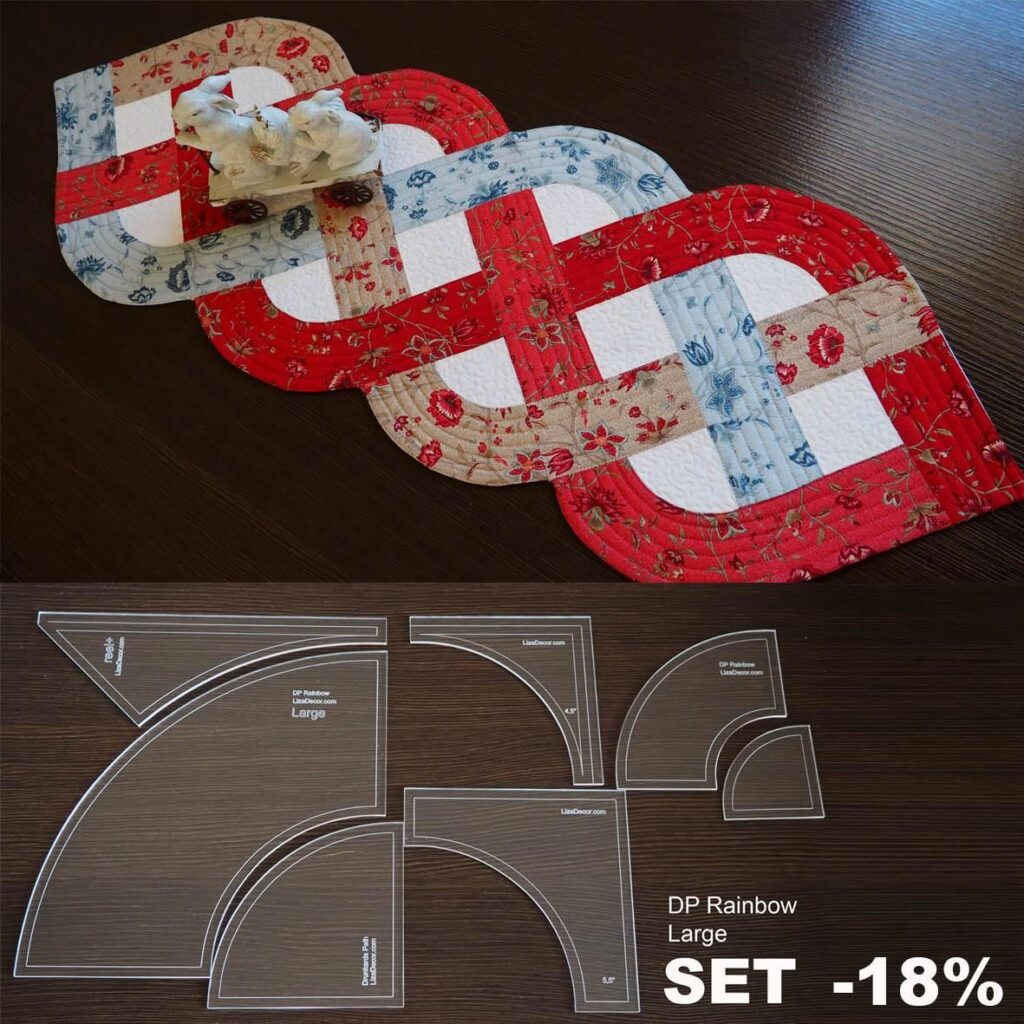
The foundation of the Rainbow small – Patchwork tablecloth braid – Quilt Pattern lies in its structure — a series of colorful strips arranged diagonally to create a braided effect. This design is inspired by traditional quilting but has a modern and playful twist. The rainbow theme represents positivity and light, making it a perfect decorative item for festive occasions or everyday cheer.
When planning your project, select a color palette that reflects your personal style. Some quilters prefer using all shades of the rainbow, from red to violet, while others might opt for gradient tones within one color family. Whatever your choice, balance is key — the goal is to create smooth transitions that give your braid a cohesive look.
To begin, cut your fabrics into long strips of equal width. Precision is important here because even small differences can affect the overall alignment of your braid. Using a rotary cutter and a quilting ruler ensures clean, straight edges. The satisfaction of seeing each strip come together is one of the great joys of quilting.
When piecing your strips, start from the center and work your way outward. This helps keep your design balanced and symmetrical. Each new strip should overlap slightly with the previous one, creating the interwoven effect that defines the braid pattern. It’s a simple yet magical technique that instantly adds texture and dimension.
Press your seams carefully as you go. This step not only keeps your fabric smooth but also gives your finished tablecloth a professional look. Using a light starch spray can help maintain crisp edges and prevent distortion during quilting. Small details like this make a big difference in the final result.
Finally, step back and admire your work. The Rainbow small – Patchwork tablecloth braid – Quilt Pattern is more than just a table accessory — it’s a piece of art that reflects your creativity, patience, and love for color.
Selecting the right fabrics is essential for achieving a beautiful Rainbow small – Patchwork tablecloth braid – Quilt Pattern. The magic lies in the combination of colors and textures that bring the design to life. Choose high-quality cotton fabrics for durability and easy handling. Cotton holds its shape well and is ideal for both beginners and experienced quilters.
When working with rainbow themes, think about the emotional tone you want to set. Bright and bold colors create a festive, energetic atmosphere, while softer tones evoke calmness and warmth. You can also experiment with prints — florals, polka dots, or geometric patterns — as long as they harmonize with the overall composition.
To ensure visual balance, consider using a neutral background fabric. Shades of white, beige, or light gray make the rainbow colors pop while providing contrast. A neutral base also helps emphasize the braid’s structure, making the pattern stand out beautifully on your table.
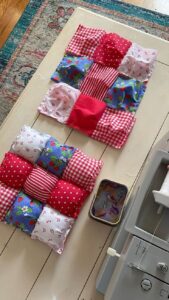
If you have a collection of fabric scraps, this project is a wonderful way to use them creatively. Mixing leftover pieces adds personality and sustainability to your quilt. Patchwork is all about storytelling — each piece can remind you of a past project, turning your tablecloth into a quilt full of memories.
Before cutting your fabrics, prewash and iron them to avoid shrinkage and ensure smooth stitching. This step may seem simple, but it’s crucial for a polished result. Wrinkled or uneven fabric can distort your braid alignment, so take the time to prepare your materials properly.
Finally, lay out your strips before sewing to preview the final look. This allows you to adjust the color order or replace pieces that don’t blend well. Taking these small steps ensures your Rainbow small – Patchwork tablecloth braid – Quilt Pattern looks harmonious and cohesive from start to finish.
Now that your fabrics are ready, it’s time to assemble your Rainbow small – Patchwork tablecloth braid – Quilt Pattern. Begin by placing two fabric strips right sides together at a slight angle. Sew along the edge with a ¼-inch seam allowance, then press the seam open. Add the next strip, repeating the process while maintaining the angle.
As the braid grows, continue alternating colors to keep the rainbow effect balanced. The key is consistency — align each strip carefully so that the braid pattern remains even. You can use pins or fabric clips to secure the strips before sewing, especially if you’re working with slippery materials.
Trim the edges of your braid occasionally to keep them straight. This makes it easier to join multiple braids later and ensures your quilt top stays square. Don’t rush the trimming process; precision at this stage saves time during assembly.
Once you’ve created several braided panels, sew them together side by side. Press the seams open to reduce bulk and maintain a smooth surface. You’ll start to see your tablecloth take shape — a radiant quilt full of energy and movement.
After completing the top, add a layer of batting and backing fabric. The batting adds softness and structure, while the backing provides durability. Use quilting pins or basting spray to hold the layers together before quilting.
Finally, quilt along the seams or create a custom design using free-motion stitching. The quilting process enhances the texture and adds depth to your piece. Finish with a neat binding around the edges, and your Rainbow small – Patchwork tablecloth braid – Quilt Pattern will be ready to brighten any table.
Once your Rainbow small – Patchwork tablecloth braid – Quilt Pattern is assembled and quilted, the final step is adding the finishing touches that make it truly yours. Start by trimming any excess fabric from the edges and squaring up the corners. A clean finish gives your project a professional appearance and ensures it lays flat on the table.
Adding a border is a great way to frame your work. Choose a solid color that complements your rainbow theme or a patterned fabric that adds extra flair. Borders not only enhance the aesthetic but also protect the edges from wear and tear.
For a personalized touch, consider hand-stitching decorative embroidery or appliqué details along the borders. These small accents can highlight certain colors or add a whimsical charm to your tablecloth. The beauty of quilting lies in its flexibility — you can make every piece unique.
If you want a reversible design, choose a coordinating fabric for the back and quilt both sides carefully. This allows you to flip the tablecloth for different occasions or moods, doubling its decorative value.
Remember to wash and press your finished quilt gently before use. This will soften the fabric and give it a cozy, inviting drape. Quilts, especially patchwork ones, often become even more beautiful with time and use.
Display your finished Rainbow small – Patchwork tablecloth braid – Quilt Pattern proudly. Whether it adorns your dining table, coffee table, or picnic setup, it will fill your space with color, creativity, and handmade warmth.
1. What is the best fabric for making a Rainbow small – Patchwork tablecloth braid – Quilt Pattern?
The best fabrics are 100% cotton quilting materials, as they are easy to sew, durable, and available in countless colors and patterns.
2. Can beginners make this pattern?
Yes, this project is beginner-friendly. The braid technique looks complex but is easy to master with basic sewing skills and patience.
3. How do I keep my fabric strips aligned while sewing?
Use a ruler, pins, or fabric clips to keep the strips even. Press seams after each step to maintain a flat, smooth surface.
4. Can I use scraps for this quilt pattern?
Absolutely! This pattern is perfect for using up leftover fabric pieces, making it both eco-friendly and budget-conscious.
5. How should I quilt the finished tablecloth?
You can quilt along the seams for a clean look or experiment with free-motion quilting for added texture and creativity.
6. How do I wash and care for my patchwork tablecloth?
Use gentle cycles with cold water and mild detergent. Air dry or tumble dry on low heat to preserve the colors and shape.
The Rainbow small – Patchwork tablecloth braid – Quilt Pattern is more than just a sewing project — it’s an artistic expression of color, patience, and joy. By following the steps and tips shared in this article, you can create a stunning piece that brightens your home and showcases your quilting talent. Remember, each fabric strip tells a story, and every stitch carries your creative energy.
We hope this guide has inspired you to start your own colorful journey into patchwork quilting. Share your honest opinion and suggestions below — your feedback helps keep the art of quilting alive and full of inspiration!


