
Cross Door - Quilt Pattern
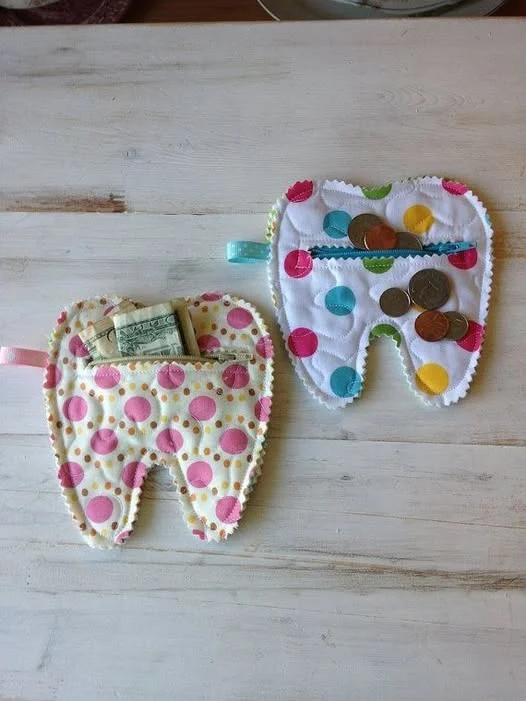
The Tooth Fairy Pocket Purse – Quilt Pattern is a delightful and creative sewing project that combines practicality with charm. Parents often search for fun and memorable ways to celebrate the tradition of the tooth fairy, and this project offers a thoughtful solution. Instead of placing a tooth under the pillow, children can store their tiny treasures in a handmade pocket purse, making the moment even more magical.
What makes the Tooth Fairy Pocket Purse – Quilt Pattern so appealing is its versatility. Quilters can personalize the fabric, colors, and finishing touches, turning each piece into a one-of-a-kind keepsake. Whether you are an experienced quilter or just starting out, this project is approachable and rewarding. It is small in scale, easy to complete, and provides plenty of room for creativity.
In this article, we will explore how to make the Tooth Fairy Pocket Purse – Quilt Pattern, step by step. You will also learn useful tips to achieve clean finishes, fabric suggestions for durability, and clever design variations that keep children excited. This project is more than just quilting—it is about creating memories that last a lifetime.
Before diving into cutting and stitching, it’s essential to prepare your materials. For the Tooth Fairy Pocket Purse – Quilt Pattern, you will need small fabric scraps, batting, thread, scissors, pins, and a sewing machine. Because the project is small, you can use leftover quilting fabrics, making it an eco-friendly and cost-effective choice.
Choosing the right fabric is crucial for both beauty and durability. Soft cottons are ideal, but you may also experiment with linen or blends for a different texture. Pick bright colors or whimsical prints to make the purse appealing to children. A fairy or star-themed design can tie in perfectly with the magical tradition.
Next, prepare the batting. Since this is a pocket purse, you don’t need thick batting, but a thin layer provides structure. Cut the batting slightly smaller than the fabric pieces to avoid bulky seams. This ensures the purse looks neat and feels comfortable to handle.
When selecting thread, consider contrast for decorative stitching or matching colors for a subtle effect. Quilters often enjoy adding hand embroidery or little embellishments to personalize their projects. Remember, the goal is to create something unique and meaningful for your child.
The size of the Tooth Fairy Pocket Purse – Quilt Pattern is also customizable. A small square or rectangle works best, around 4–6 inches wide. The pocket must be large enough for a tooth and a small gift, yet compact enough to tuck under a pillow easily. Flexibility in design makes this project suitable for quilters of all levels.
Lastly, gather your tools in an organized space before beginning. Preparation helps avoid mistakes and ensures that your sewing experience is enjoyable and efficient. Once everything is ready, you can move on to the cutting stage with confidence.
The first step in creating the Tooth Fairy Pocket Purse – Quilt Pattern is cutting your fabric. Cut two main pieces of fabric for the body of the purse, one for the front and one for the back. Then, cut a smaller rectangle for the pocket. Don’t forget to cut a piece of batting for added structure.
Accuracy in cutting ensures a professional finish. Use a rotary cutter and ruler to achieve straight edges and even shapes. Precision now will save you trouble later when sewing the seams. Always double-check your measurements before cutting, especially when making multiple purses as gifts.
Next, layer the pieces. Place the batting between the front and back fabric layers, creating a quilt sandwich. For the pocket, fold the fabric’s top edge under and stitch it to create a clean hem. This little detail adds durability and gives the purse a polished look.
Once the pocket is hemmed, pin it to the front piece of the purse. Make sure it is centered and even. You can sew along the sides and bottom to attach it, leaving the top open for storing the tooth and gift. Children love having a tiny dedicated space just for them.
Now it’s time to assemble. Place the front and back pieces right sides together, then sew around the edges, leaving a small opening to turn the purse right side out. After turning, press the fabric flat and close the opening with a neat topstitch. This finishing step gives the purse a tidy edge.
Quilting lines can now be added for decorative effect. Straight lines, zigzags, or even little star shapes can enhance the design. The quilting not only adds beauty but also reinforces the purse, ensuring it withstands handling by excited little hands.
The fun part of the Tooth Fairy Pocket Purse – Quilt Pattern is customizing it with finishing touches. Adding buttons, ribbons, or embroidery can transform a simple project into a treasured keepsake. Children especially enjoy designs that reflect their favorite colors or characters.
Consider stitching a small applique, like a star, heart, or tooth, onto the pocket. Applique adds personality and makes the purse feel magical. You can also embroider the child’s initials or name, making the item deeply personal and unique.
Adding a closure is optional but helpful. A small snap, button, or Velcro strip keeps the contents secure. Since the purse is small, avoid heavy closures. Lightweight options work best and are easy for children to manage.
If you enjoy hand quilting, this is the perfect chance to showcase your skills. Tiny hand stitches around the edges or decorative motifs across the surface can add charm. Hand-sewn details often make projects stand out as thoughtful handmade gifts.
For extra creativity, you can design the purse as a small envelope with a flap instead of a standard pocket. This variation makes it more exciting for children, as it feels like opening a secret pouch. A flap also provides extra security for the tooth and reward.
Don’t forget to press the finished purse to smooth out seams and folds. A final press gives the project a professional appearance. At this point, your Tooth Fairy Pocket Purse – Quilt Pattern is ready to be used and cherished.
The beauty of the Tooth Fairy Pocket Purse – Quilt Pattern is that it allows endless creative variations. You can adapt the design for different occasions, making it not only for the tooth fairy tradition but also as a small gift pouch for birthdays or holidays.
One popular variation is creating themed purses. For example, a Christmas version could feature festive fabrics, while a birthday purse might showcase balloons or cupcakes. This flexibility makes the project a versatile addition to your quilting skills.
Another idea is to create a matching set. Parents may want to make one for each child in the family, ensuring everyone has their own personalized keepsake. Matching sets also look wonderful when displayed or gifted.
If you enjoy teaching, this project is excellent for beginners. Its simplicity and small size make it ideal for workshops or sewing classes. Students can finish it quickly and leave with a completed item, boosting their confidence.
The Tooth Fairy Pocket Purse – Quilt Pattern also makes a thoughtful handmade gift. Grandparents, aunts, or friends who enjoy quilting can create one for children in their lives. Handmade gifts carry emotional value that store-bought items can never replace.
Lastly, consider making a memory quilt later using fabrics from multiple pocket purses. Each purse becomes part of a larger story, capturing milestones in a child’s journey of growing up. This creative idea turns small projects into a lasting family treasure.
What size should the Tooth Fairy Pocket Purse be?
A good size is around 4–6 inches wide. It should be small enough to fit under a pillow but large enough to hold a tooth and a small surprise.
Can beginners make the Tooth Fairy Pocket Purse – Quilt Pattern?
Yes, it is perfect for beginners. The small scale and simple construction make it approachable and rewarding for quilters at any level.
What fabrics are best for this project?
Cotton fabrics are ideal because they are easy to sew and soft to touch. However, you can also experiment with linen or blended fabrics for different textures.
Do I need a sewing machine to complete this project?
While a sewing machine speeds up the process, it can also be sewn by hand. Hand stitching adds a unique charm and works well for small items like this.
How can I personalize the Tooth Fairy Pocket Purse?
You can add embroidery, appliques, buttons, or even the child’s initials. Customization makes the purse a cherished keepsake.
Is batting necessary for the project?
Yes, but only a thin layer is needed. Batting gives the purse structure and a quilted look without making it too bulky.
The Tooth Fairy Pocket Purse – Quilt Pattern is more than just a sewing project—it is a way to create magical moments for children while celebrating a cherished tradition. Its small size, simplicity, and creative potential make it enjoyable for quilters of all skill levels. From cutting and assembling to adding unique embellishments, this project offers a perfect balance of practicality and creativity.
Now that you’ve explored how to make the Tooth Fairy Pocket Purse – Quilt Pattern, we’d love to hear from you. Share your sincere opinion, experiences, and suggestions so others can be inspired too. Your feedback helps build a community of creativity and encouragement.


