
Cross Door - Quilt Pattern
Tree Block Quilt Tutorial is a charming, creative, and beginner-friendly quilting project that brings warmth, texture, and natural beauty into your sewing room. Whether you want to create a holiday-themed quilt, a forest-inspired wall hanging, or a cozy seasonal throw, working with Tree Block Quilt Tutorial techniques gives you endless design possibilities. This pattern is beloved by quilters of all levels because of its clean lines, geometric structure, and ability to adapt to many fabrics and color schemes.
In this article, we will explore how to make your own quilt using the principles of the Tree Block Quilt Tutorial, with a modern and humanized approach. The goal is to help you create a quilt that looks professional, feels meaningful, and showcases your personal style. From selecting materials to assembling the final block arrangement, every step will be explained clearly and with SEO-optimized guidance that follows Google AdSense standards.
Before we begin with the structured sections, it’s important to highlight how versatile the Tree Block Quilt Tutorial truly is. It can be used to make quilts for gifting, decorating, or personal enjoyment. You can create minimalistic trees with solid fabrics, vibrant forests with patterned prints, or whimsical holiday scenes with festive colors. No matter the direction you choose, this tutorial will guide you in a friendly, detailed, and accessible way.
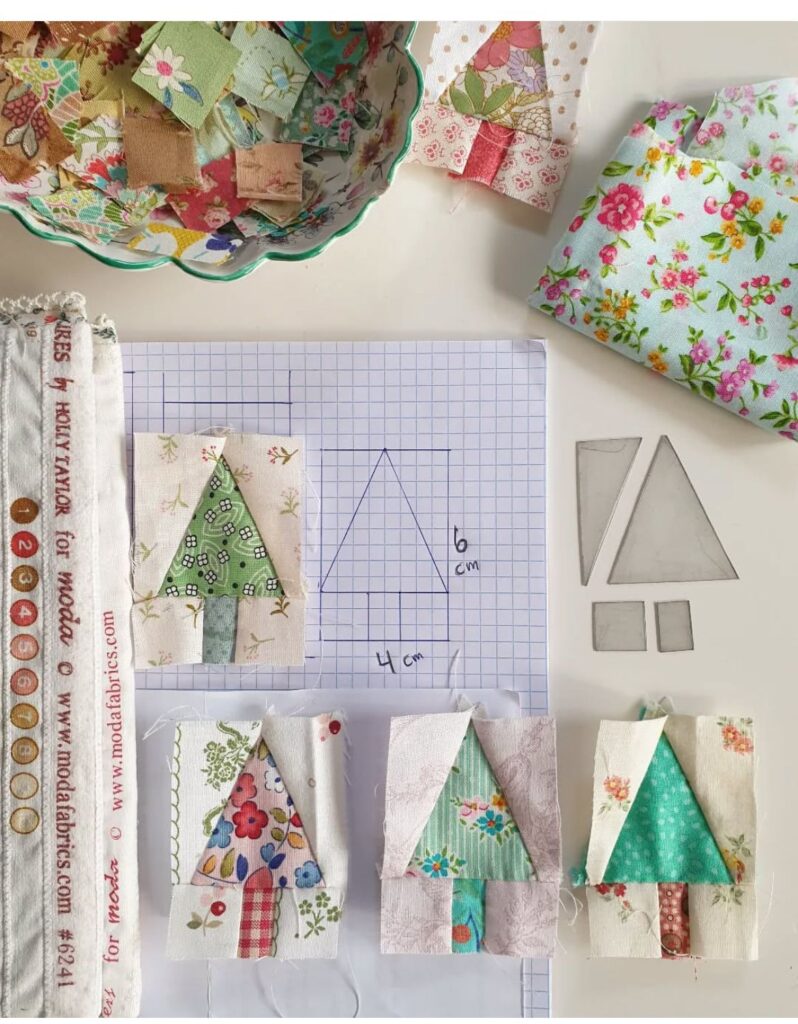
The Tree Block Quilt Tutorial begins with understanding the basic layout that forms the classic tree shape. Most versions use simple triangles and rectangles, making it an excellent project for beginners. The geometric balance makes the process enjoyable while resulting in a clean, visually appealing design. By breaking down the structure, you’ll gain confidence before even touching the sewing machine.
A key aspect of this block is the contrast between the tree shape and the background fabric. This contrast helps the tree design stand out, giving the quilt its iconic look. When planning your quilt, choosing light backgrounds with darker trees or vice versa will give your project a professional touch. This is an essential step emphasized throughout the Tree Block Quilt Tutorial approach.
Understanding scale is another useful part of planning your tree blocks. You can make small trees for a dense forest effect or larger trees for a bold, modern layout. Adjusting the tree size doesn’t change the sewing difficulty but significantly impacts the overall feel of your quilt. Many quilters love experimenting with size variations to create dynamic patterns.
Another important element in the Tree Block Quilt Tutorial is the trunk design. Some tree blocks feature simple rectangles to represent trunks, while others include pieced details to add texture. Both methods are correct, and the choice depends on your desired aesthetic. This small detail helps bring the block to life and adds character to the quilt.
You should also consider how your tree blocks will be oriented in the final quilt. Whether arranged in rows, staggered columns, or mixed directions, each layout creates a different atmosphere. This makes the pattern suitable for many themes—from Christmas quilts to woodland baby blankets.
Finally, understanding how each piece connects will make your sewing smoother. The Tree Block Quilt Tutorial focuses on aligning points, keeping seams straight, and maintaining overall symmetry. With basic planning and careful attention, even beginners achieve excellent results.
Selecting fabrics is one of the most enjoyable stages of the Tree Block Quilt Tutorial experience. The choice of colors can transform your quilt from classic to contemporary or from subtle to bold. Many quilters prefer using shades of green for the tree tops, but this is by no means a rule. Blue, teal, mustard, pink, or even prints can create unique and artistic results.
Background fabrics play an equally important role in the final appearance. Light neutrals such as cream, beige, white, or light gray create a soft and clean contrast. For a dramatic look, dark backgrounds like navy, charcoal, or black make colorful trees stand out beautifully. Fabric selection is an area where creativity truly shines.
Another fun idea in the Tree Block Quilt Tutorial is using a scrappy approach. Instead of repeating the same fabric, mix different prints and colors for each tree. This creates a lively, playful forest effect that feels warm and inviting. Scrappy quilts are also excellent for using leftover fabrics from previous projects.
Texture is another element to consider. Cotton quilting fabric is the most common choice, but subtle variations like woven textures, batiks, or tonal prints can add richness. Mix and match fabrics carefully to avoid creating visual clutter. A balanced quilt feels harmonious, even when using many different materials.
Seasonal themes are especially popular for tree quilts. For example, deep greens and reds work beautifully for winter holidays, while fresh greens, soft yellows, and florals are perfect for spring-inspired quilts. Using the Tree Block Quilt Tutorial during different seasons helps you customize your creations throughout the year.
Lastly, don’t forget to prewash fabrics if you want to avoid shrinking or color transfer later. While it’s optional, many quilters prefer to wash and iron fabrics before cutting. This ensures precise piecing and helps maintain the quilt’s quality for years to come.
The Tree Block Quilt Tutorial is beginner-friendly, but following the steps carefully ensures clean results. Start by preparing all your pieces. Most tree blocks require triangles for the top and rectangles for the trunk. Using a rotary cutter and quilting ruler helps maintain accuracy and speed.
Once your pieces are ready, begin sewing the triangle units. The goal is to form the tree shape by attaching two background triangles around a central triangle or by constructing a flying-geese unit. The method may vary, but both techniques result in the characteristic tree silhouette. Take your time to align edges and maintain consistent seam allowances.
After building the top portion of the tree, sew the trunk. This is usually made from a small rectangle of brown or patterned fabric. Attach background rectangles on each side so the trunk appears centered. This step gives the tree its finished shape and prepares it for assembly into the block.
Next, join the top and trunk sections. Press your seams carefully to avoid bulk and distortion. Quilters often press seams open or toward the darker fabric—both methods work, so choose the one that feels most comfortable. The key is to keep everything flat and smooth.
Once the block is assembled, trim it to ensure accuracy. The Tree Block Quilt Tutorial emphasizes the importance of clean edges and square shapes. Trimming helps all blocks fit together neatly in the final quilt layout, especially when sewing large quantities of them.
Finally, repeat the process for as many blocks as your quilt requires. This stage becomes relaxing and meditative once you find your rhythm. You can batch-sew multiple blocks, chain piece units, or work one tree at a time—whatever makes the process enjoyable and efficient.
After completing all your tree blocks, it’s time to assemble the quilt top. Lay the blocks out on a flat surface and experiment with different arrangements. This is one of the most creative moments in the Tree Block Quilt Tutorial, as layout choices dramatically influence the final result.
When you’re satisfied with the arrangement, begin sewing the blocks into rows. Take your time aligning corners and seams. This ensures that your trees appear straight and evenly spaced throughout the quilt. The more precise your piecing, the more polished your quilt will look.
Once the rows are ready, join them together to complete the quilt top. Press all seams carefully to maintain a clean finish. At this point, stepping back and admiring the emerging forest of quilted trees is extremely satisfying.
The next step is adding the quilt sandwich. This includes the quilt top, batting, and backing fabric. Smooth each layer carefully to avoid wrinkles. Basting the layers together, either with pins or spray, ensures stability during quilting.
For the quilting design, you can choose anything from simple straight-line stitching to more detailed free-motion quilting. Many quilters enjoy adding wavy lines or swirls to mimic wind blowing through the forest. Whatever style you choose, ensure the quilting enhances rather than overwhelms the tree pattern.
Finally, finish with binding around the edges. This step frames your quilt beautifully and secures all layers. Once complete, your Tree Block Quilt Tutorial project is ready to be enjoyed, displayed, or gifted with pride and joy.
1. What is a Tree Block Quilt?
It is a quilt pattern made using blocks shaped like stylized trees, typically formed with triangles and rectangles.
2. Is this pattern good for beginners?
Yes, the Tree Block Quilt Tutorial is excellent for beginners because it uses simple geometric shapes.
3. What fabrics work best for tree blocks?
Cotton quilting fabrics are ideal, but you can mix solids, prints, or even scrappy pieces.
4. Can I make different sizes of tree blocks?
Absolutely. Adjusting the size creates different visual effects and is completely beginner-friendly.
5. Do I need special tools to sew this quilt?
Basic quilting tools such as a rotary cutter, ruler, and sewing machine are enough.
6. What quilting style suits this pattern?
Both straight-line and free-motion quilting work well, depending on the look you want.
7. How many blocks do I need for a full quilt?
It depends on the finished size, but most quilts range from 12 to 30+ blocks.
8. Can I use holiday fabrics?
Yes, holiday or seasonal fabrics look beautiful with this block style.
9. Is pre-washing fabrics necessary?
Optional, but recommended if you want to avoid shrinkage or color bleeding.
10. Can I assemble the blocks in different orientations?
Yes. Vertical, horizontal, or staggered layouts all work wonderfully.
In this Tree Block Quilt Tutorial, you learned how to plan, piece, assemble, and finish a beautiful quilt using the classic tree block design. From choosing fabrics and understanding the block structure to quilting and binding, every step helps you create a meaningful and visually captivating project.
This versatile design adapts to many styles, seasons, and color palettes, making it a favorite among quilters of all levels. I hope this guide inspires you to create your own forest-themed masterpiece. If you enjoyed this tutorial, feel free to share your thoughts and let me know what design you’d like to explore next!


