
Cross Door - Quilt Pattern
The mesmerizing beauty of the Whirl Kaleidoscope Quilt Pattern has captured the hearts of quilters around the world. Known for its intricate layout and bold, spinning effect, this quilt design blends color, symmetry, and movement into a stunning visual masterpiece. Whether you’re an experienced quilter or just venturing into more complex patterns, the Whirl Kaleidoscope Quilt Pattern is both a challenge and a joy to create.
This captivating pattern mimics the shifting designs of a kaleidoscope, with fabric pieces carefully cut and arranged to form rotating shapes and mirrored symmetry. The result is a quilt that appears to move and shimmer, drawing the eye into its depth and structure. Crafting such a quilt involves precision, planning, and creativity, making it a rewarding project for anyone seeking to enhance their quilting skills.
In this article, you’ll find a comprehensive breakdown of the Whirl Kaleidoscope Quilt Pattern, including how to prepare materials, tips for cutting and layout, guidance on sewing and pressing, and suggestions for finishing and displaying your quilt. Whether you’re quilting for a special gift, a showpiece, or personal satisfaction, this pattern offers the perfect blend of artistry and technique.
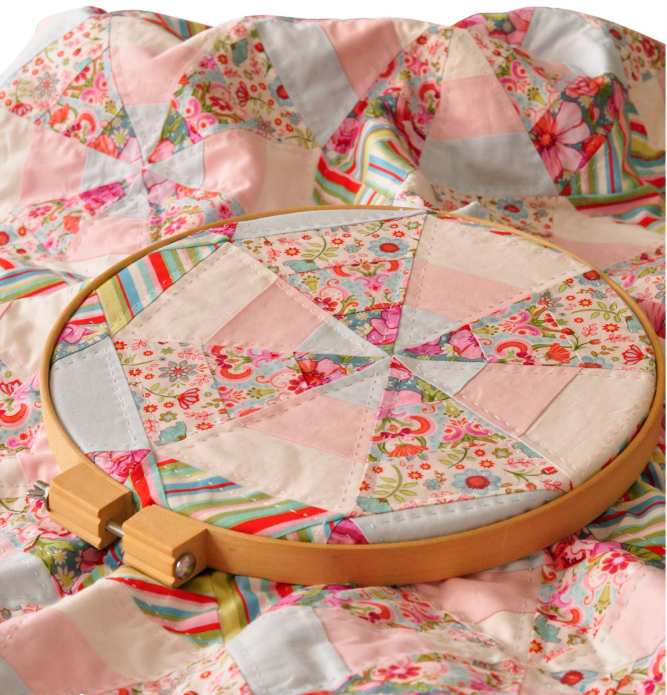
One of the most important steps in working with the Whirl Kaleidoscope Quilt Pattern is gaining a clear understanding of its structure. Unlike traditional square block quilts, the kaleidoscope design relies on wedges and angled cuts that form starburst or pinwheel effects when joined together.
To begin, study examples of finished kaleidoscope quilts to familiarize yourself with the geometry. Most designs feature repeated segments cut from the same fabrics, laid out in radial symmetry. This consistent repetition is key to achieving the “whirl” illusion that gives the pattern its name.
Fabric choice is critical. Because this pattern emphasizes contrast and rotation, selecting a dynamic color palette will amplify its optical effects. High-contrast combinations, such as black and white, bright and dark hues, or warm and cool tones, create the strongest visual impact. Fabrics with gradients or ombré transitions also work beautifully.
Many quilters recommend using solids or tone-on-tone prints to keep the focus on shape rather than texture. However, strategically placed prints can add surprise and complexity. Just be careful not to overwhelm the design with too many competing patterns.
Choose a background fabric that supports your focal colors without drawing too much attention. A neutral or subtly textured background allows the kaleidoscope to pop while providing structure to the layout.
Always purchase a little extra fabric than you think you need—especially for directional prints—since precise fussy cutting may require more material. Planning ahead saves time and stress as you piece together your Whirl Kaleidoscope Quilt Pattern.
Precision is everything when it comes to cutting the components for your Whirl Kaleidoscope Quilt Pattern. The central unit of this design is a wedge, typically cut using a specialized ruler or a paper template with sharp angles.
Before cutting into your fabric, test your template on scrap material to confirm that angles match up correctly when pieced together. Commonly, quilters use 45° or 60° wedge shapes, which, when pieced in a circle, form the characteristic pinwheel or starburst pattern.
Lay out your fabric and cut your wedges carefully, using a rotary cutter and a sharp blade for clean edges. Consistency is essential; even slight variations in angle or size can throw off the alignment of your finished block. Label your pieces if using multiple fabrics to stay organized.
Once your wedges are cut, begin piecing them together into circular segments. Most kaleidoscope designs involve eight or twelve wedges per block, depending on your chosen angle. Sew two wedges at a time, using a ¼-inch seam allowance and pressing seams open for flatness.
As you assemble the segments, frequently check your points and intersections. Accurate alignment ensures the center of your block lies flat and the illusion of rotation remains intact. If your pieces don’t line up perfectly, don’t be afraid to unpick and resew.
Use pins or clips to help hold your pieces together as you work. This extra step may take a little longer but can greatly improve the outcome of your Whirl Kaleidoscope Quilt Pattern.
With your kaleidoscope blocks completed, the next phase in your Whirl Kaleidoscope Quilt Pattern project is arranging them into a cohesive layout. Depending on your fabric choices, you can create spirals, sunbursts, or intricate optical illusions across the quilt top.
Lay your blocks on a large design wall or floor space. Rotate and rearrange them until the transitions between blocks feel fluid and balanced. This step is where your creative decisions really come into play. Some quilters opt for a uniform layout, while others stagger color placement to enhance the whirl effect.
Consider adding sashing between blocks to give visual breathing room and stabilize the quilt top. Thin borders in a neutral or accent color can frame each segment without distracting from the central design.
Once your layout is finalized, sew the blocks together row by row. Press the seams carefully and square up the entire quilt top. Double-check all corners for neatness—this preparation will make the quilting process smoother and more enjoyable.
Choose a quilting pattern that complements, rather than competes with, the geometry of your quilt. Straight-line quilting works well with the sharp edges of kaleidoscope wedges, while echo quilting enhances the radial movement. Free-motion designs can add softness and texture, but use them sparingly to avoid cluttering the design.
Decide whether you’ll quilt by machine or hand, and be sure to baste your quilt sandwich thoroughly to avoid shifting layers. A walking foot or free-motion foot may help with precise quilting lines over seams and junctions.
After completing the quilting, it’s time to give your Whirl Kaleidoscope Quilt Pattern the perfect finish. Binding not only secures the edges of your quilt but also serves as a final design element.
Select a binding fabric that either blends with your border or adds a bold frame to your design. Some quilters use scrappy bindings made from leftover fabrics used in the quilt, which ties the piece together beautifully.
Measure and cut your binding strips, typically 2½ inches wide, and sew them together to create one long continuous strip. Fold the strip in half lengthwise and press. Attach the binding to the front of the quilt using a ¼-inch seam, then fold it to the back and stitch it in place by hand or machine.
Adding a quilt label is an important finishing touch. Include your name, the date, and any details about the occasion or inspiration behind the quilt. It adds a personal connection and historical context to your work.
When displaying your Whirl Kaleidoscope Quilt Pattern, consider the lighting and location to highlight the dynamic visuals. Wall hangings allow you to showcase the pattern like artwork. If you’re using the quilt on a bed, coordinate with solid bedding to make the design stand out.
Don’t forget to photograph your finished quilt! Documenting your process and final creation helps track your progress as a quilter and inspires others in the community.
Celebrate your accomplishment. Quilts like this take time, patience, and creativity. You’ve brought a spinning work of fabric art to life, full of color, detail, and energy.
What is the best fabric type for a kaleidoscope quilt?
100% cotton is highly recommended because it’s easy to cut and press. Solids or subtle tone-on-tone prints work best to highlight the pattern’s symmetry.
Can beginners attempt the Whirl Kaleidoscope Quilt Pattern?
While this pattern is more advanced, a confident beginner with basic piecing and pressing skills can take it on with patience and the right tools.
Do I need a special ruler for cutting wedges?
Yes, a kaleidoscope or wedge ruler helps achieve accurate angles. Alternatively, you can create templates from cardstock or use paper piecing techniques.
How do I avoid bulk at the center of each block?
Press seams open or alternate directions to reduce bulk. You can also trim tips if needed, just be careful not to compromise the points.
What’s the ideal size for a finished kaleidoscope block?
Sizes vary, but most blocks range from 8 to 12 inches. Larger blocks are easier to handle and reduce the number needed for a full quilt.
Is it necessary to block quilt blocks before assembly?
Blocking is helpful but not always essential. If your blocks aren’t lying flat or are slightly distorted, blocking can help correct shape and size.
The Whirl Kaleidoscope Quilt Pattern is more than just a design—it’s an artistic journey filled with creativity, technique, and satisfaction. From choosing the perfect fabrics to mastering the angles of each wedge, this pattern challenges you to grow as a quilter and rewards you with a visually stunning finished product.
Throughout this article, we explored the fundamentals of design, fabric selection, wedge cutting, layout planning, quilting, and finishing details. Whether you’re making a gift or creating a showpiece for your home, the Whirl Kaleidoscope Quilt Pattern brings beauty, motion, and personal flair to your craft.
If you’ve enjoyed this guide, please leave your honest opinion and any suggestions. Did you try a new color scheme or adapt the layout to your own style? Your feedback helps build a warm and inspiring community of quilt lovers everywhere.


