
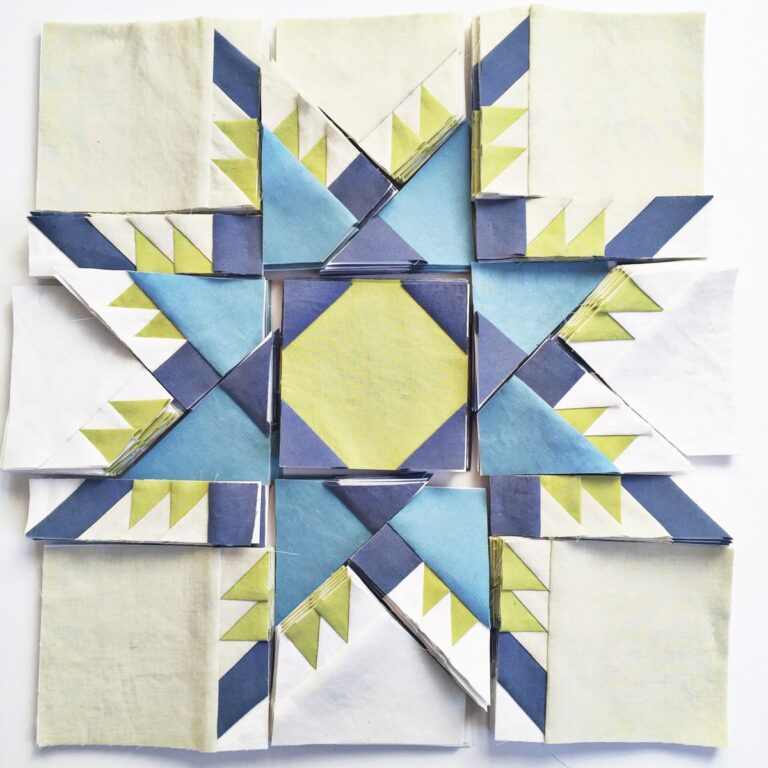
Summer-Country-Star-Flower - Quilt Pattern
The WHIRLYGIG PINWHEEL – Quilt Pattern is one of those joyful, timeless designs that instantly adds movement, charm, and personality to any quilting project. This pattern combines playful geometry with classic piecing techniques, creating a quilt that looks both dynamic and balanced. Whether you’re a beginner looking for an easy yet impressive project, or an experienced quilter searching for something cheerful to brighten your sewing days, this pattern has everything you need. The WHIRLYGIG PINWHEEL – Quilt Pattern captures the essence of traditional patchwork while allowing creative freedom through color and layout choices.
This quilt pattern is famous for its spinning pinwheel effect, which gives the illusion of motion on a flat surface. The bold, whirling design is created by arranging half-square triangles (HSTs) in a specific sequence, producing a lively and vibrant quilt block. Many quilters love this design because it’s simple to sew but visually striking, making it perfect for a wide range of fabric styles—from modern prints to vintage florals. The WHIRLYGIG PINWHEEL – Quilt Pattern is ideal for using up fabric scraps, allowing you to play with color contrasts and make each block unique.
In this guide, we’ll walk through how to understand, assemble, and personalize your WHIRLYGIG PINWHEEL – Quilt Pattern. You’ll learn step-by-step techniques for accurate piecing, creative tips for color selection, and advice on finishing your quilt beautifully. This pattern doesn’t just teach you how to make a quilt—it inspires you to celebrate the joy of handmade art.
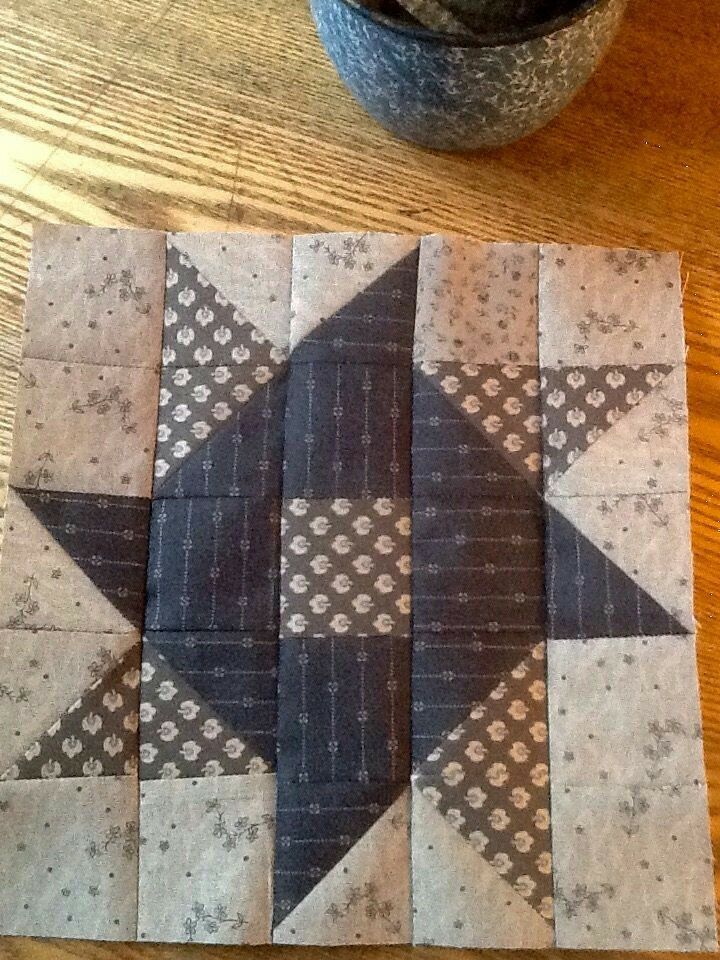
The WHIRLYGIG PINWHEEL – Quilt Pattern is built upon the foundation of the traditional pinwheel block, which consists of four triangles forming a spinning effect. What makes the Whirlygig version special is its slightly off-center rotation, giving the illusion of continuous movement. This twist on the classic pinwheel adds a touch of whimsy and modern flair.
To create the distinctive motion effect, quilters use half-square triangles (HSTs), which are versatile building blocks in quilting. By arranging these HSTs in alternating directions, the WHIRLYGIG PINWHEEL – Quilt Pattern achieves that delightful spinning look that catches the eye. The pattern can be scaled easily, meaning you can make small wall hangings or large bed quilts using the same technique.
Color selection plays a major role in this design. Many quilters choose contrasting colors, such as light and dark shades, to emphasize the rotation of the pinwheel. Others use a monochromatic palette to create a softer, more subtle effect. No matter your choice, the WHIRLYGIG PINWHEEL – Quilt Pattern allows endless creativity.
Another key feature of this pattern is its simplicity in construction. Even though the final result looks intricate, the sewing process is straightforward. Each block is composed of easy-to-cut squares and triangles, making it perfect for beginners who want to build confidence.
Experienced quilters can elevate the design further by experimenting with fabric textures, such as mixing cotton with linen or batik fabrics. The contrast of materials enhances depth and adds personality to the quilt. With a bit of imagination, the WHIRLYGIG PINWHEEL – Quilt Pattern becomes a personal masterpiece.
Finally, understanding the pattern means understanding the story it tells. The spinning motion represents energy, joy, and creativity—a true reflection of the quilting spirit.
The beauty of the WHIRLYGIG PINWHEEL – Quilt Pattern lies in its simplicity and flexibility. To begin, you’ll need two contrasting fabrics. Choose one for the background and another for the pinwheel. This contrast is essential to highlight the design’s movement.
Start by cutting equal-sized squares from both fabrics. Pair one light and one dark square, place them right sides together, and draw a diagonal line from one corner to the other. Sew a seam ¼ inch away on both sides of this line, then cut along the drawn line to create two half-square triangles.
Press the seams open or to one side—whichever method you prefer—and trim each HST to the exact size needed for your block. Precision is important in quilting, and trimming ensures your blocks fit together neatly. Arrange four of these HSTs to form the signature whirling shape of the WHIRLYGIG PINWHEEL – Quilt Pattern.
Once you have your layout set, join the pieces row by row, paying attention to the direction of the triangles. This alignment is what creates the illusion of motion. Use pins to secure intersections and maintain accuracy as you sew.
After sewing the four units together, press the entire block flat. You’ll immediately notice the spinning effect coming to life. Repeat this process for as many blocks as you need for your quilt. Depending on the size you want, you can make dozens of these cheerful pinwheels.
With each completed block, you’ll see your quilt growing into a delightful display of pattern and motion. The WHIRLYGIG PINWHEEL – Quilt Pattern is not only beautiful—it’s an enjoyable, stress-free project that gives a sense of accomplishment with every block finished.
Color plays a crucial role in the success of the WHIRLYGIG PINWHEEL – Quilt Pattern. Because the design relies heavily on contrast, the right combination of hues can completely transform the overall appearance of your quilt.
If you love a bright and cheerful look, choose bold primary colors like red, yellow, and blue. For a more sophisticated or vintage vibe, opt for muted tones such as dusty rose, sage green, or navy. The contrast between the pinwheel and background fabric should always be noticeable enough to showcase the spinning motion.
Many quilters enjoy creating scrappy versions of the WHIRLYGIG PINWHEEL. Using leftover fabric from previous projects adds charm and character, turning your quilt into a vibrant patchwork of memories. This is also a sustainable way to make beautiful quilts without wasting fabric.
Another great approach is to use a color gradient. By arranging fabrics in a transition from light to dark, your quilt will appear to have layers of movement and dimension. Ombre effects work particularly well with the WHIRLYGIG PINWHEEL – Quilt Pattern.
If you prefer a modern minimalist look, use a neutral background such as white, gray, or beige, and let your pinwheels pop with a single accent color. This approach gives your quilt a clean and elegant appearance that fits into any home decor style.
Ultimately, your color choice should reflect your personality. The WHIRLYGIG PINWHEEL – Quilt Pattern offers endless possibilities, making it an excellent project for creative experimentation.
After assembling all your blocks, it’s time to join them into rows and sew the quilt top together. When working with the WHIRLYGIG PINWHEEL – Quilt Pattern, it’s important to align the pinwheels carefully so the overall layout maintains its sense of flow.
Once your quilt top is complete, layer it with batting and backing fabric. Secure the layers using quilting pins or basting spray to prevent shifting. Choosing your quilting style can dramatically affect the finished look. A simple stitch-in-the-ditch technique emphasizes the pinwheel shapes, while free-motion quilting adds a soft, artistic touch.
For those who want to enhance the motion effect, try quilting along the direction of the pinwheel arms. This reinforces the spinning illusion and gives the quilt texture and depth.
Binding is another important finishing step. A bold binding can frame your quilt beautifully, while a subtle one keeps the focus on the pattern. Choose a fabric that complements your main colors.
Finally, label your quilt with the name “WHIRLYGIG PINWHEEL – Quilt Pattern,” the date, and your signature. It’s a lovely way to document your creation and make it a part of your quilting legacy.
Caring for your quilt is simple—gentle washing and proper storage will preserve its colors and texture for years. This pattern is more than a craft project; it’s a celebration of creativity, patience, and love for fabric art.
1. What skill level is needed for the WHIRLYGIG PINWHEEL – Quilt Pattern?
This pattern is perfect for beginners and intermediate quilters. It uses simple half-square triangles and basic piecing techniques, making it easy to follow.
2. How much fabric do I need for this quilt?
The fabric requirements depend on the size of your quilt. For a lap-size version, you’ll need approximately 2 yards of background fabric and 2 yards of contrasting fabric.
3. Can I make this quilt using scraps?
Absolutely! The WHIRLYGIG PINWHEEL – Quilt Pattern is ideal for using fabric scraps. The mix of prints and colors creates a lively, unique result.
4. What quilting method works best with this pattern?
Both straight-line and free-motion quilting work beautifully. Many quilters prefer stitch-in-the-ditch to highlight the pinwheel shapes.
5. Can I resize the blocks?
Yes, you can easily resize the blocks by adjusting the size of your starting squares. Larger squares will create bigger pinwheels, perfect for bed quilts.
6. What fabrics are recommended?
Cotton fabrics are the most popular choice, but you can also experiment with linen or batik for added texture and interest.
The WHIRLYGIG PINWHEEL – Quilt Pattern is a timeless and joyful design that brings movement, energy, and charm to any quilting project. Its simple construction, creative flexibility, and striking appearance make it a favorite among quilters of all levels. From color selection to finishing techniques, this pattern encourages creativity while offering a rewarding sewing experience.
If you love quilts that tell a story and radiate positive energy, the WHIRLYGIG PINWHEEL – Quilt Pattern is a perfect choice. Have you ever made this pattern or a similar pinwheel quilt? Share your thoughts and experiences—I’d love to hear how this design inspires your creativity!


