
Cross Door - Quilt Pattern
is a charming and creative project that blends classic quilting techniques with a touch of holiday magic. For many quilters, making a bold and joyful Yo-yo tree – Quilt Pattern becomes a delightful opportunity to practice texture, scrap-busting, and decorative stitching in one unique piece. This tutorial-style article is structured to help beginners and experienced quilters alike create a beautiful Yo-yo tree design with confidence and creativity.
Working with yo-yos has been a beloved tradition in quilting for generations. The small fabric circles gathered at the edges bring an organic, dimensional effect to any quilt block or wall hanging. When arranged in the shape of a tree, they create a playful and festive visual that fits perfectly into seasonal decor or personalized handmade gifts. Throughout this article, the term Yo-yo tree – Quilt Pattern is emphasized to help guide your learning and support your search intentions.
Before diving into techniques, materials, and layouts, it’s important to understand how this pattern works. Yo-yos can be made from all types of fabrics, and their size variations allow you to customize your trees in endless ways. With the right fabric selection and a solid structure, your Yo-yo tree – Quilt Pattern becomes a beautiful representation of creativity, color coordination, and quilting craftsmanship.
The first step in mastering the Yo-yo tree – Quilt Pattern is understanding how traditional yo-yos are made. Yo-yos are circular fabric pieces that are gathered around the edge and tightened to create a small dimensional puff. This classic technique allows quilters to use leftover scraps in a creative and sustainable way.
Making yo-yos does not require advanced sewing experience. Even beginners can create perfect yo-yos with just a needle, thread, and circular templates. The key is to maintain consistent stitches along the edge and pull the thread gently to avoid tearing the fabric. Once gathered, each yo-yo becomes a stable component for assembling your tree design.
The size of your yo-yos will influence the final look of the quilt pattern. Larger yo-yos create bolder, fuller trees, while smaller ones allow for more detailed shaping. Choosing sizes that suit your style gives your Yo-yo tree – Quilt Pattern personality and balance.
An important aspect of working with yo-yos is selecting fabrics with enough body to hold their shape. While quilting cottons are the most popular option, using batiks or textured fabrics can add interest. The color palette also plays a major role in making the quilt visually appealing.
Organization is essential when preparing yo-yos for your tree layout. To keep your work flowing smoothly, consider sorting yo-yos by size, tone, and texture before assembling. This helps you visualize the final tree shape and maintain a harmonious structure throughout your Yo-yo tree – Quilt Pattern.
To create the Yo-yo tree – Quilt Pattern, selecting the right materials ensures durability and aesthetic appeal. The good news is that this project is highly flexible and scrap-friendly, making it ideal for quilters who love repurposing leftover fabrics. Start by gathering your preferred fabrics, ensuring they coordinate well for a cohesive look.
You will also need circular templates. These can be plastic templates, cardboard circles, or any round household object used as a guide. The diameter of the circles determines the final yo-yo size, so choose carefully based on the effect you want for your tree.
Thread selection is another important detail. Strong, high-quality thread will ensure that your yo-yos hold up well over time. Neutral shades usually work best, but you may also choose colored thread to match your fabric or add decorative elements.
Your background fabric will serve as the canvas for your Yo-yo tree – Quilt Pattern. Whether you choose a solid, low-volume, or patterned background, make sure it complements the colors of your yo-yos without overpowering them. This harmony helps the tree shape stand out clearly in the final composition.
Optional embellishments include beads, buttons, embroidery stitches, and decorative trims. These details can enhance the texture and personality of your Yo-yo tree, especially if you intend to display it as a Christmas decoration or special gift. Embellishments should be added after the yo-yos are firmly secured.
Before starting assembly, press all fabrics and prepare your working space. A clean, flat surface will help you arrange the yo-yos properly and adjust their placement as needed. Taking time during preparation ensures a smoother experience as you complete your Yo-yo tree – Quilt Pattern.
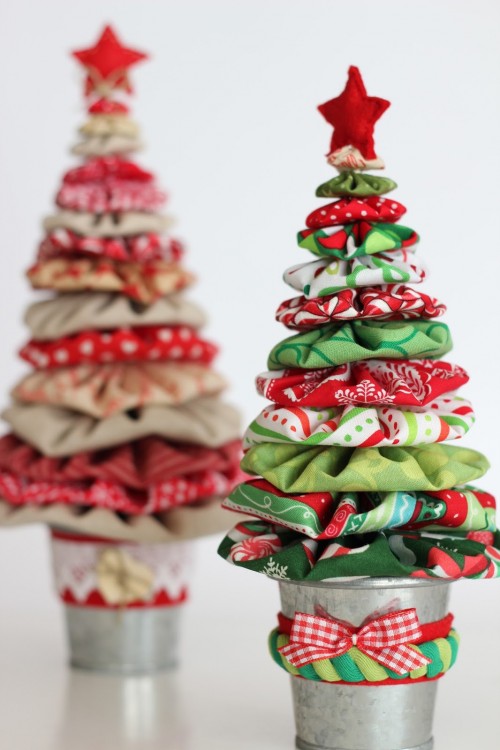
Once your yo-yos are ready, the assembly process becomes the most enjoyable phase. Start by arranging the yo-yos into a triangle shape to form the tree. Place larger yo-yos at the bottom and smaller ones at the top for a proportional and visually appealing design.
Adjust the yo-yos until you find the perfect layout. This step is essential, as it defines the overall balance and flow of your Yo-yo tree – Quilt Pattern. Take your time experimenting with color combinations, spacing, and texture.
Next, secure each yo-yo to the background fabric using hand stitching. Small, discreet stitches work best, ensuring the yo-yos remain flat and evenly positioned. Hand sewing also allows better control when adjusting the shape and tension.
Adding the tree trunk is another important detail. You can create a trunk using a small rectangle of fabric, a few smaller yo-yos, or even a strip of felt. The trunk should complement the overall palette and support the structure of your tree.
For added dimension, consider layering yo-yos. Stacking smaller yo-yos on top of larger ones creates a multi-dimensional look that enhances the richness of the quilt. This optional technique gives the Yo-yo tree – Quilt Pattern an artisanal and textured finish.
After securing all elements, give the quilt top a final inspection. Check that each yo-yo is firmly attached and that the tree shape looks even. This careful review ensures a polished result before moving on to quilting and finishing.
The final stage of your Yo-yo tree – Quilt Pattern involves quilting, binding, and adding decorative details. Choose a quilting method that complements the texture of the yo-yos without flattening them too much. Stitching around the yo-yos, rather than through them, is often the best approach.
A simple quilting design, such as straight lines or gentle curves, helps enhance the background while keeping the yo-yos as the focal point. Avoid complex quilting patterns that may distract from the tree shape or compete with the design.
Once the quilting is complete, prepare the binding. The binding fabric should coordinate with the background and frame the quilt beautifully. Traditional double-fold binding provides durability and a clean finish.
If you enjoy adding embellishments, this is the perfect moment. Small beads placed at the center of some yo-yos can imitate ornaments. Tiny buttons can represent lights or accents. These small touches bring additional charm to your Yo-yo tree – Quilt Pattern.
A hanging sleeve can be added to the back if you intend to display your quilt on a wall. This step transforms your project from a simple quilt block into a decorative art piece, perfect for seasonal decoration or gifting.
Finally, give your finished project a gentle press around the edges and admire your work. The Yo-yo tree combines tradition, texture, and creativity—making it a meaningful addition to your quilting journey.
What is a yo-yo in quilting?
A yo-yo is a gathered fabric circle sewn with a running stitch around the edges and tightened to form a textured puff used in quilt designs.
Do I need a sewing machine for the Yo-yo tree – Quilt Pattern?
No. Yo-yos are typically made by hand, and the entire project can be completed without a sewing machine.
What fabrics work best for yo-yos?
Quilting cotton is ideal, though any lightweight, non-stretch fabric works well.
How many yo-yos do I need for a Yo-yo tree?
The number varies depending on the tree size, but most small wall hangings use between 20 and 50 yo-yos.
Can I wash a quilt with yo-yos?
Yes, but gentle washing is recommended to preserve the shape and stitching of the yo-yos.
Is this pattern beginner-friendly?
Absolutely. The Yo-yo tree is perfect for beginners looking to practice hand sewing and experiment with fabric scraps.
Creating the Yo-yo tree – Quilt Pattern is a joyful and rewarding quilting experience that blends simplicity with creativity. This pattern allows you to use fabric scraps, explore color combinations, and add your own artistic touch through embellishments and layout choices.
With its festive shape and handmade charm, the Yo-yo tree becomes a treasured keepsake or gift. I hope this guide inspires you to start your own Yo-yo tree project—feel free to share your results or ask for help whenever needed!


